

Rater Nomination Phase
Assessees must have rater lists before any of the subsequent assessment phases can be initiated. All assessment participants (both assessees and raters) must be pre-populated in Manage PARTICIPANTS. At present all assessment participants must be pre-populated with email addresses as Engage ASSESS functions omit all employees without email addresses.
Rater lists can be provided for assessees via any one, or a combination, of the methods described below.
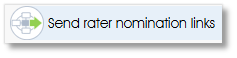
The first method, Send rater nomination links, launches a full-scale Rater nomination exercise. The other 3 methods are streamlined mechanisms to create rater lists for assessees as quickly and effortlessly as possible.
The first two methods, Send rater nomination links and Auto-populate rater list(s), act on lists of employees whose checkboxes have been selected in the Assessees list. The functions in the side panel will be greyed out until at least one checkbox has been ticked.
Method 3, Import rater lists, does not require employees to be selected. Its function in the side panel is never greyed out.
The fourth method, Add rater list, operates on a single, highlight-selected employee. The Add rater list side panel function will be greyed out until an employee has been selected (highlighted in burgundy).
Method 1: Send rater nomination links
 |
Request - via email - selected employees to edit their own rater lists |
Checkbox-select the appropriate employee(s) in the Assessees list then click on the Send rater nomination links function in the Assess workflow toolbox group in the side panel.
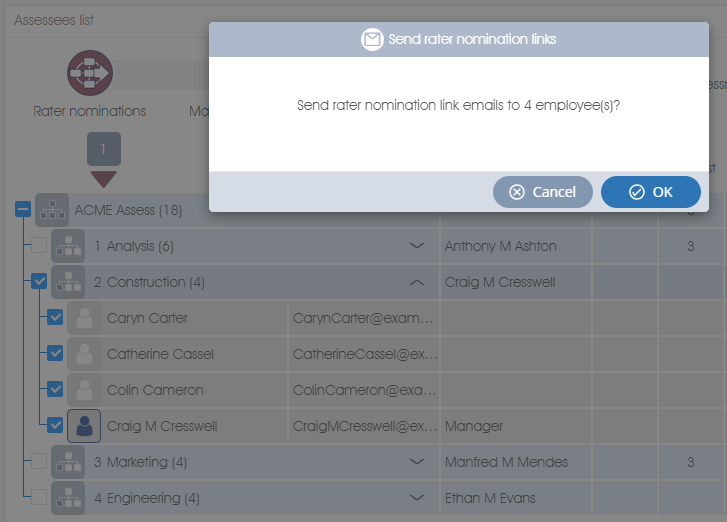
Check that the number of employees to receive rater nomination link emails tallies with the expected number of assessees, and click OK.
This process can be repeated as often as necessary. Should, for example, assessee(s) have been omitted when rater nomination emails where sent previously; or if the assessment has been extended to additional employees; or when new employees are taken on during the project lifespan; they can be included in the assessment quickly and easily by ticking their checkboxes and re-running the Send rater nomination links function.
A Rater nomination email sent icon (see Assessees list icons) will be displayed in the Nominate status column for every assessee to whom a nomination email has been sent.
Information for the Rater Nomination Email Recipient
Clicking the link in the rater nomination email will present the assessee with an auto-populated rater selection form. The auto-population algorithm used here is the same as for the Auto-populate rater list(s) toolbox function (Method 2 - described below).
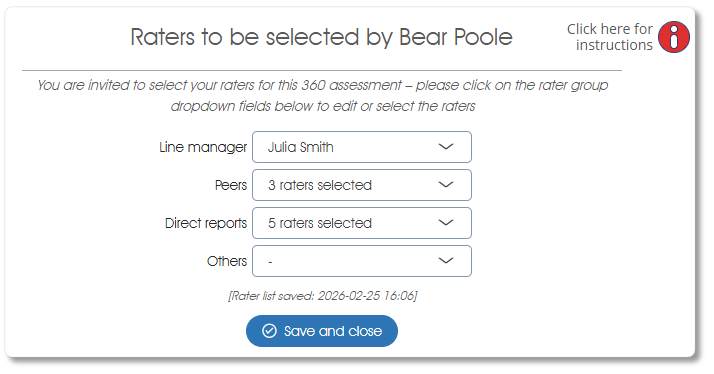
The assessee should review the presented auto-populated rater list, selecting new and/or deselecting existing raters as required (see Editing a Rater list for detailed instructions). A Rater list saved icon will replace the Rater nomination email sent icon in the Nominate status column after the assessee has clicked the Save and close button.
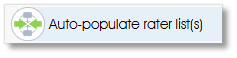
Method 2: Auto-populate rater list(s)
 |
Programmatically build rater lists for selected assessees |
This method depends on a defined hierarchical reporting level structure in Manage PARTICIPANTS to determine line managers, peers and direct reports (see Flat lists vs Hierarchies for an explanation). Once the required employees’ checkboxes in the Assessees list have been checked, click on Auto-populate rater list(s) in the Rater lists toolbox group in the side panel. A confirmation window will open:

Ensure that the number of employee(s) selected for auto-population (4 in the above example) tallies with the expected number of assessees. In the example above there are 4 potential assessees as only business unit 2 Construction, which has 4 employees (see the number in brackets beside the business unit name), has been selected for auto-population.

Note that the number of employees listed in brackets after the business unit name includes both off- (if any have been defined) and on-system employees. Since off-system employees cannot participate in an assessment, the number of on-system employees will be needed for the comparison, should a business unit with off-system employees, eg. business unit 1 Analysis in the above example, be selected.
Click OK when you are sure the number of employees to be auto-populated is correct .
The auto-population process determines peers, direct reports, and line managers associated with the assessee in the organizational structure (i.e. the Manage PARTICIPANTS>Actual or Virtual structure specified during assessment project creation) if the corresponding Multi-rater assessment questionnaires have been configured.
When the auto-population function has completed a Rater list not approved icon will be displayed in the Rater list status column for every employee for whom a rater list has been generated. This process can be repeated as often as necessary.
Method 3: Import rater lists
 |
Import rater lists for specified assessees |
Any number of assessees and their corresponding raters are listed in a pre-prepared Excel template file:
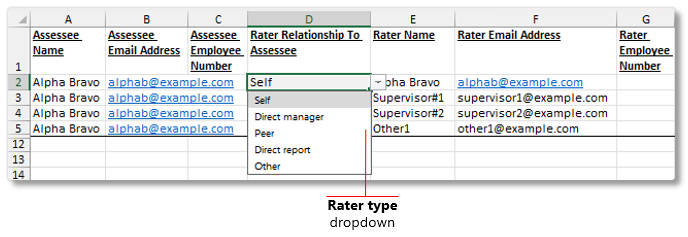
An empty Excel template file with the required column headings can be downloaded by clicking the Download template link in the Import rater lists dialogue window, accessed via the Import rater lists function in the Rater lists toolbox group:
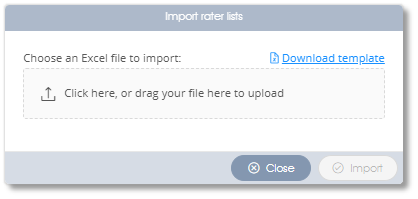
Once the Excel file has been prepared, import the data by clicking the Import rater lists function in the side panel. Select the Excel file to be imported by clicking in the rectangular box to open a file selection dialogue window or drag and drop the Excel file to be imported into the rectangular box.
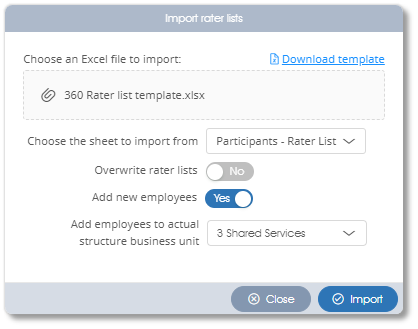
Rater list(s) can either be appended to the existing rater list(s), or the existing lists will be overwritten if the Overwrite rater lists slider is set to Yes. New employees can be added via the import file when the Add new employees slider is set to Yes and a destination, where the new employees are to be stored in the organizational structure, has been provided:
If the importer encounters any errors the import process will be suspended and an error message will be displayed.
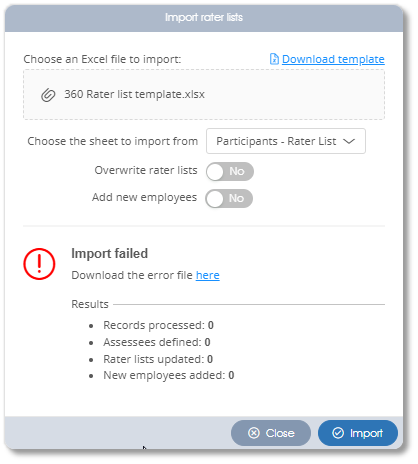
To see a list of all the errors, click the Download the error file here link to download an updated version of the Excel file you attempted to import. The cells with erroneous contents will be highlighted in red and the Errors tab will contain detailed error messages. Fix all the errors before retrying the import.
When the import function is complete a Rater list not approved icon will be displayed in the Rater list status column for every employee for whom a rater list has been saved.
When the Import rater lists function is used the Manager review phase is usually omitted - the rater lists are usually deemed to have been approved by management during the data collection and Excel import file preparation processes.
Method 4: Add rater list
 |
Create a rater list via the UI editor for a single, selected employee |
To add a rater list for a single, highlight-selected employee click on the employee’s entry in the Assessees list. The entry will be highlighted in burgundy and the assessee selected.

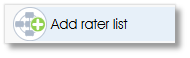
Click the Add rater list function in the Rater lists toolbox group in the side panel or the Add rater list item in the dropdown menu. An auto-populated rater selection dialogue window will open. The auto-population algorithm used here is the same as for the Auto-populate rater list(s) toolbox function (Method 2 - described above).
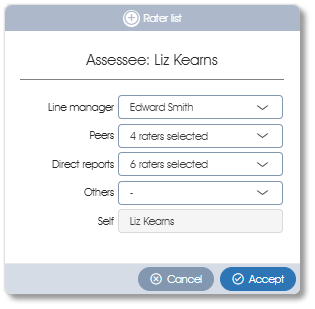
The auto-populated rater list presented should be reviewed, selecting new and/or de-selecting existing raters as required (see Editing a Rater list for detailed instructions). A Rater list not approved icon will be displayed in the Rater list status column after the Accept button has been clicked.
After rater lists have been created via one or more of the above methods, the updated Assessees list will resemble this example.
| For more information, click on a sub-menu item at the top of the page⇑ or in the right margin⇒ |