
 |
 |
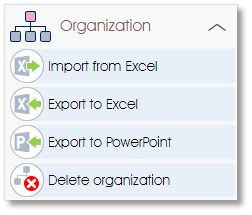
The Organization toolbox group in the side panel will allow you to import or export employee details to or from an Excel file, export selected business units to PowerPoint, or to delete some or all employees and related information in the current employee list.
 |
Import employee details with optional demographic data and/or business unit affiliations from an Excel file |
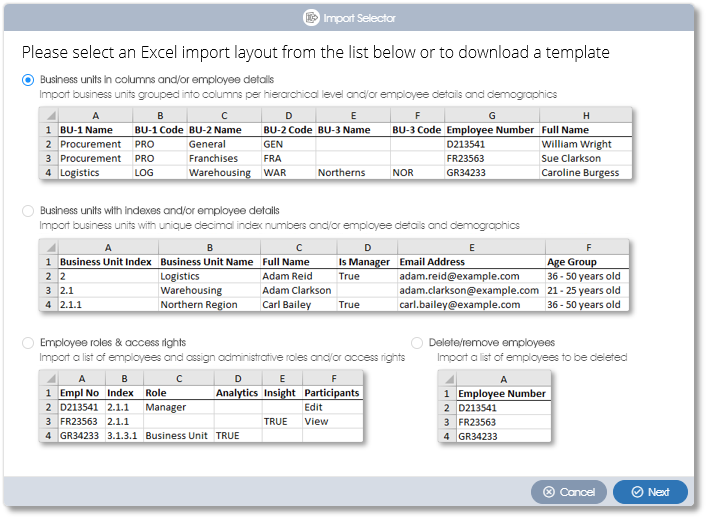
The Import from Excel function will provide System Administrators with the following Excel import options:
- Business units in columns and/or employee details - import a list of business units and/or employee details, with the business units grouped into separate columns per hierarchical level;
- Business units with indexes and/or employee details - import a list of business units and/or employee details, with unique decimal index numbers for each business unit;
- Employee roles & access rights - import a list of employees to be assigned administrative roles and access rights; and
- Delete/remove employees - import a list of employees to be deleted from the system.
Importing Employee Records and/or Business Units
To import employee data via an Excel file, the Excel file must be prepared and formatted as outlined below:
- Excel file extension – the import file must be a native Excel file with a *.xlsx file extension. Note: you can create a sample Excel import template file using the Export Organization toolbox function, or you can download a template via the Import Organization dialogue window.
- Column headings – the data can be structured with any column headings. The columns will be mapped to the appropriate fields when the file is imported. However, using the default field names as covered in a downloaded template file for column headings will simplify the importing process (see the previous point on how to generate a sample Excel import file).
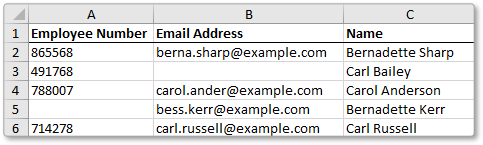
- Importing a flat list of employees – the Excel file must have as a minimum the following columns: (1) employee name, and (2) unique email address OR unique employee number (columns A or B in the example below). To import the employee details to specific business units, simply include a column with the decimal index numbers of the business units.
If no business unit index numbers were included, the system will prompt you to select a business unit into which the employee records should be imported: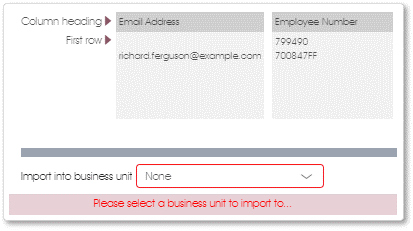
- Importing business units with index numbers – to import the level-based hierarchy of business units with business unit index numbers, the Excel import file must have at least the following columns: (1) business unit index number, and (2) business unit name (columns A and B in the example below). Please see Organizational Structures for more on the use and application of business unit index numbers.
- Importing business units in columns – business units can also be imported into a level-based hierarchy if they are grouped into different columns for each of the hierarchy levels, as illustrated in the example below (columns A, B and C). Decimal business unit index numbers will be automatically generated and saved with the respective business units when importing the data.

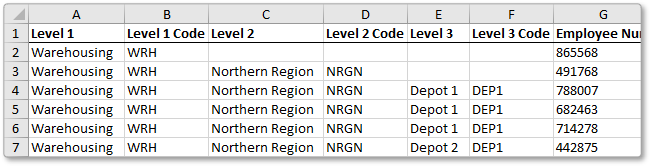
- Importing business units with codes – business units can be imported with unique codes associated to each business unit name. In the example below, codes have been associated to the business units on levels 1, 2 and 3 (columns B, D and F). This will allow business unit information and employee details to be imported from Excel files created by an HRIS system that supports such, and will simplify the updating and maintenance of business unit and employee records.
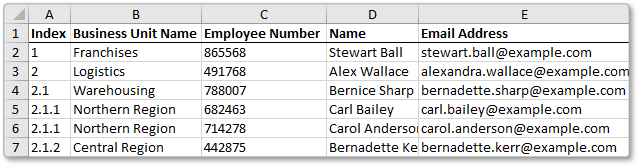
- Importing employees and business units – employee details with their business unit affiliations can be imported in one go; business units with the level-based hierarchy as defined in the Excel file will be created on the fly, and employees will be added to the appropriate business units. To import employee data as well as business unit information, the Excel import file must have at least the following columns: (1) business unit index, (2) business unit name, (3) employee name, and (4) email address OR employee number (columns A, B, C and D or E in the example above). The Excel columns will be loaded and displayed as shown below.
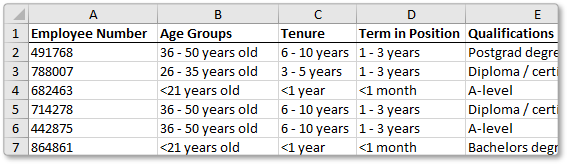
- Importing demographic data – demographic data can be imported at the same time, together with the employee and business unit data. In the example below, the Age Groups, Tenure, Term in Position and Qualifications data of all the employees will be imported. Demographic data can be mapped to existing demographic categories if they have been defined before the time, or demographic categories can be created during the import exercise, on the fly (see the next section).
Once the Excel file has been prepared with the necessary columns, the data can now be imported. To get started with the process, click on the Import organization toolbox function in the side panel. Select the Excel file to be imported by clicking in the square box to open a File Open dialogue window and to select the Excel file to be imported, or drag and drop the file into the square box.
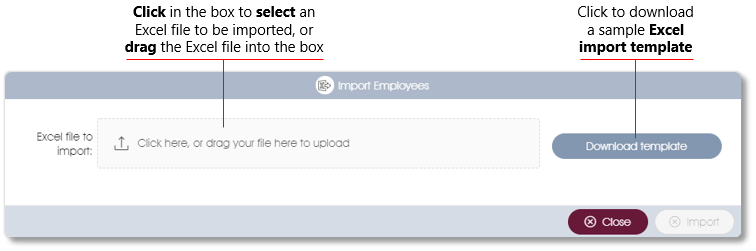
Note: you can download an empty Excel import template file with the required column headings by clicking on the Download template button. The Excel file will be opened and the following information and options will be displayed in the dialogue window:
| 1. | Excel column headings & data – the column headings of the Excel file will be displayed, and beneath them the first 6 rows of data. If required, use the scroll bar to scroll to the right to view the rest of the Excel columns. |
| 2. | Excel file name – the name of the Excel file that is to be imported will be displayed in the box. Click on the box to select and load a different Excel file, or drag the Excel file into the box. |
| 3. | Select the Excel tab – click on the dropdown to select the Excel tab that should be loaded (if the Excel file has more than one tab with data). |
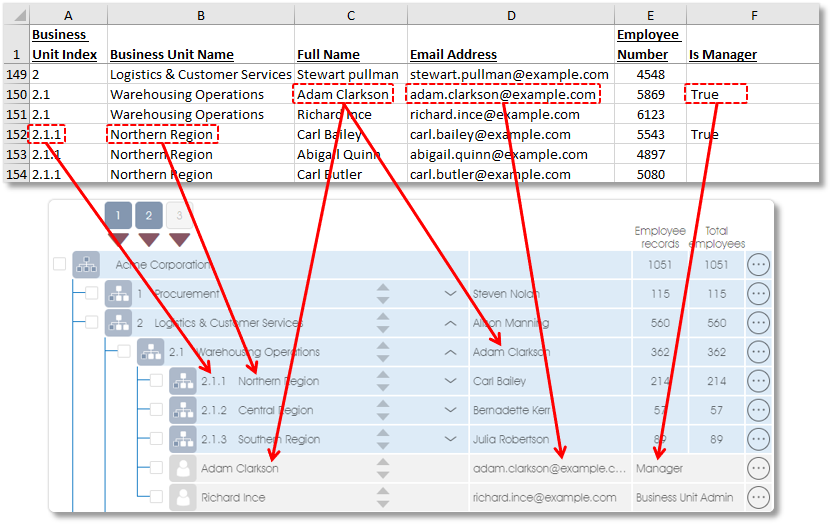
| 4. | Overwrite existing content – select this option if you have already captured some employee data and you want to update or overwrite the existing data with new content. This would be particularly useful if you want to add new employees to the employee list, update existing employees’ demographic data (e.g. age group), update the business unit affiliations of employees who have been transferred to different business units, or if you want to add new business units and their employees. |
| 5. | Add demographic data – select this option if you intend to import demographic data with the employee data. You can use this function to either update the demographic attributes of one or more employees, or to create and add new demographic categories and/or attributes. The system will compare the selected column headings to the existing demographic categories if any, and if it finds a match, will update the demographic attributes of the related employee records. If it doesn’t find a match, it will create a new demographic category, using the column heading as the demographic category name. |
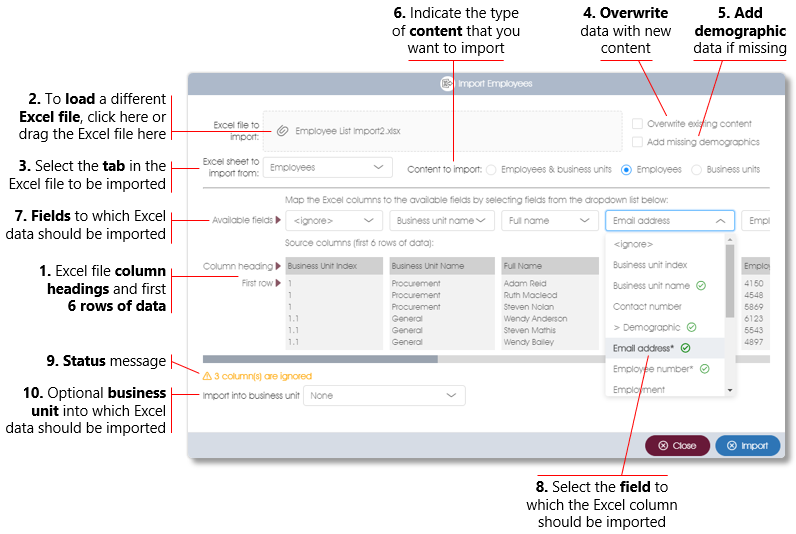
| 6. | Content type – indicate the type of content you want to import: employees, business units, or both. Important: each of the content types have mandatory fields that must be mapped, otherwise the import function will not work (see the next point). |
| 7. | Map fields for importing – map the Excel columns to corresponding fields by selecting a data field from the dropdown for each of the Excel columns. The system will automatically match the Excel column headings to data fields if certain predetermined column headings were used, e.g. a column with the heading ‘Full Name’ will automatically be mapped to the Full Name field. |
| 8. | Selecting fields – fields that have already been selected for mapping will be marked with a green tick mark. Mandatory fields for each of the content types will be marked with an Asterisk – see the table below. To ignore a field, simply select the <Ignore> option, and to import a column as demographic data, select the > Demographic field type; the system will automatically map the data to the appropriate demographic category (if it exists) – see point (5) above. |
| Content to import | Mandatory fields |
Employees |
Full name |
Business units |
Business unit index |
Employees & business units |
Business unit index |
| 9. | Status message – the number of Excel columns containing data that will not be imported will be displayed here, i.e. all columns for which you have selected the field. |
| 10. | Import data into a specific business unit – Excel data with no business unit index column or where no column has been mapped for importing to the Business unit index field, can be imported into any business unit by selecting one from the dropdown list. |
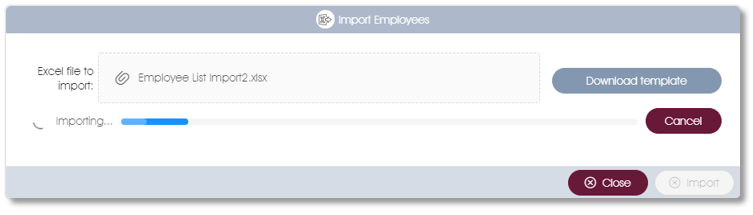
The Import button will only become active once you have selected a valid Excel file and mapped the mandatory fields. Click on the Import button to start with the import – the status and progress of the import process will be shown by means of a status bar.
Importing Employee Access Rights and Roles
To import employee access rights and/or roles via an Excel file, the Excel file must be prepared and formatted as outlined below:
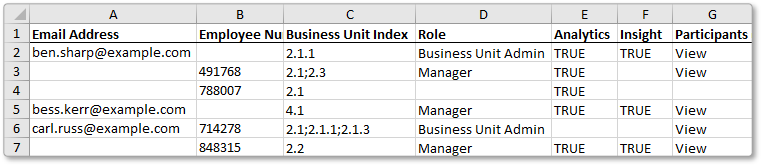
- Email address or employee number – to identify the employee to whom the role or access right should be assigned, either the employee's email address or employee number should be included as an unique identifier.
- Business unit(s) – the decimal index number of one or more business units that will be affected should be included, separated by a semi-colon.
- Role – indicate the role that should be assigned to the employee, either (1) Manager or (2) Business Unit Admin of one or more business units. Assigning a role to an employee via the Excel import function will override any previous roles that have been assigned. See Edit & View Rights for more on employee roles.
- Analytics – indicate whether the employee should have access to the Engage ANALYTICS module.
- Insight – indicate whether the employee should have access to the Engage INSIGHT module.
- Participants (View/Edit) – indicate whether the employee should have View or Edit access to the Manage PARTICIPANTS module. Please note that the employee will only be able to view or edit the business units that were assigned to him or her.
Deleting Employee Records from the System
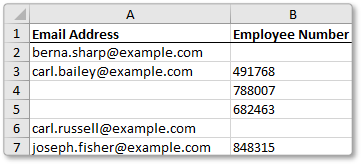
To delete the records of one or more employees from the system, simply import an Excel file with either the employee's email address or employee number as a unique identifier. Please note that this operation cannot be reversed - the employee records will be permanently deleted and cannot be recovered. The affected employees' survey responses that were recorded in any prior surveys will however not be deleted and will remain part of the surveys' recorded results.
Dealing with Errors
If the importer encountered any errors in the import file, the import process will be suspended and an error message will be displayed.
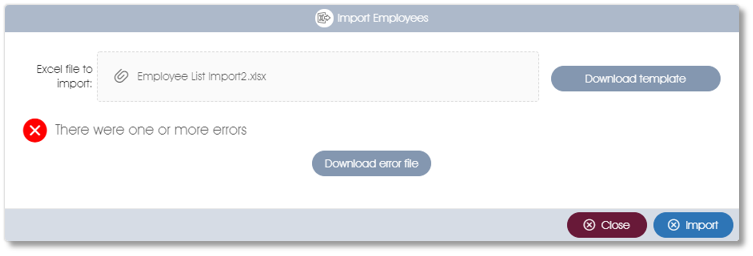
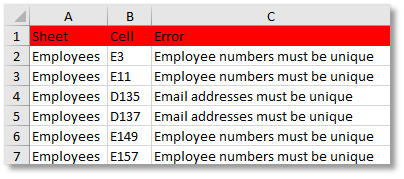
To see a list of all the errors, click on the Download error file button to download an updated version of the Excel file you tried to import. The cells with actual errors will be highlighted in red – see the duplicate emails in the example below.
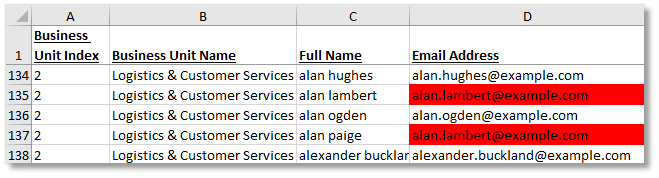
A tab with the name ‘Errors’ and a description of all the errors will be added to the Excel file – the Excel sheet, cell reference, and a short description of the error will be included.
The errors as described in the error tab must first be fixed or removed before the file can be successfully imported. Records with missing data for a mandatory field (e.g. email address) will be ignored and will not be imported. A successful import will result in a status screen with a summary of the data that was imported (see below).

 |
Export the current employee list with demographic data and business unit affiliations to an Excel file |
The Export to Excel function will export all the current employee records, inclusive of their business unit affiliation and demographic data (if any), to an Excel file. The columns in the Excel file will have the associated data field names as headings, which will make the reimporting of the Excel data a breeze. This will allow you, for instance, to export the current employee list in Excel, edit the Excel file to reflect all the changes in your current organizational structure, and then to reimport the Excel file after having deleted the current content (see the next function).
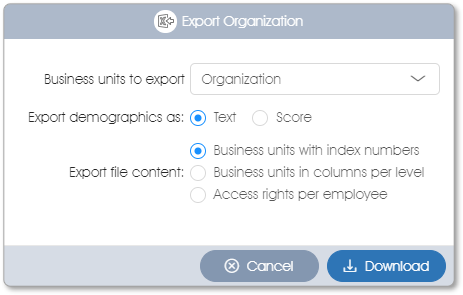
- Business units to export – the employee records of all the organization's employees will be exported by default; click on the drop-down to select one or more business units to selectively export employee details.
- Export demographics – select the Text option to export demographic attributes as text strings (e.g. 26 - 35 years), or select the Score option to export the demographic attributes as numbers.
- Export file content – select the appropriate option to export the employee records with business units indicated either via decimal index numbers or in separate hierarchical columns, or select the Access rights per employee option to export the employee records with access rights (e.g. Engage INSIGHT) and roles (Manager or Business Unit Admin) where appropriate.
 |
Export one or more selected business units to a PowerPoint file |
The Export to PowerPoint function will export selected business units to a maximum of 3 levels below the top selected business unit, to a PowerPoint file. Click on the Export to PowerPoint toolbox function in the side panel or in the toolbox dropdown menu. A dialogue window as shown below will be displayed.
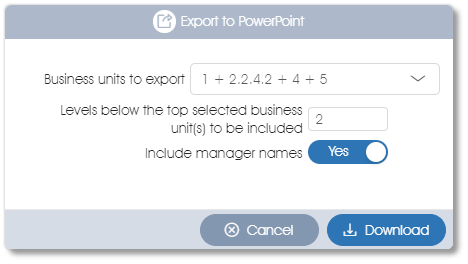
- Business units to export: the top or root of the organizational structure will automatically be selected. To select one or more business units to be exported, click on the dropdown field and select the business units from the business unit filter dialogue that will be displayed.
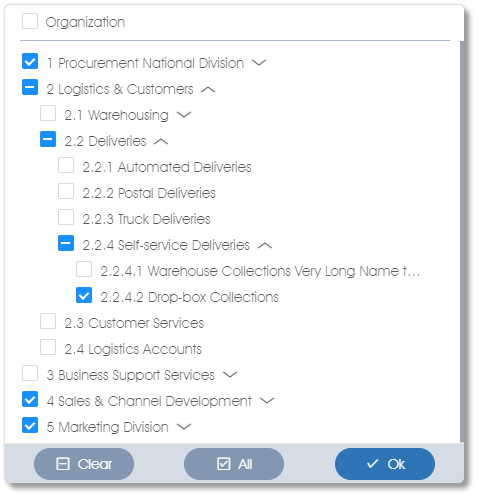
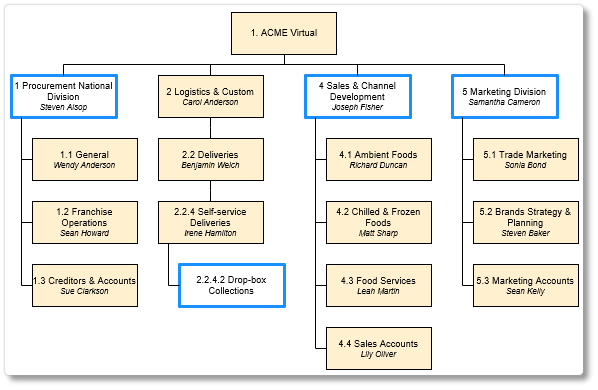
- Levels below the top selected business unit(s) to be included: indicate the number of levels below the top selected business unit that must be included in the export file - a maximum of 3 levels will be allowed. The system will automatically include all the business units that are one (1) level down from the top selected business unit. To illustrate using the example above, the sub-units that fall directly under 1 Procurement National Division, 4 Sales & Channel Development, and 5 Marketing Division will be included in the export. Other business units that were selected at a lower level, e.g. 2.2.4.2 Drop-box Collections, will also be included, as well as their parent units higher up in the hierarchy.
- Include manager names: select the Yes option to include the names of business unit managers (where available) in the PowerPoint export.
Click on the Download button to create the PowerPoint export file - you will be prompted to provide a file name. The selected business units will be exported as editable objects into a PowerPoint file. In the example below, the blocks with the blue outlines represent the business units that were selected for exporting in the example dialogue shown above.
 |
Delete the current employee list with all the employee, demographic and business unit affiliation data |
Use this function to delete all the employee records and business units, leaving you with an empty organizational structure so you can start to capture or import data again from scratch. Important: deleting the organizational data is a drastic step that cannot be undone, so use with caution!
Deleting the organizational employee list is final and cannot be restored. Please note the following:
- Previous surveys that have already been completed will not be impacted.
- While there is an active survey running, it will not be possible to delete the organization or any business units; new business units and individual employees can however be added and individual employees deleted.
- Deleting the employee list will result in access that was granted to employees via their roles as managers or administrators being removed.
| For more information, click on a sub-menu item at the top of the page⇑ or in the right margin⇒ |