
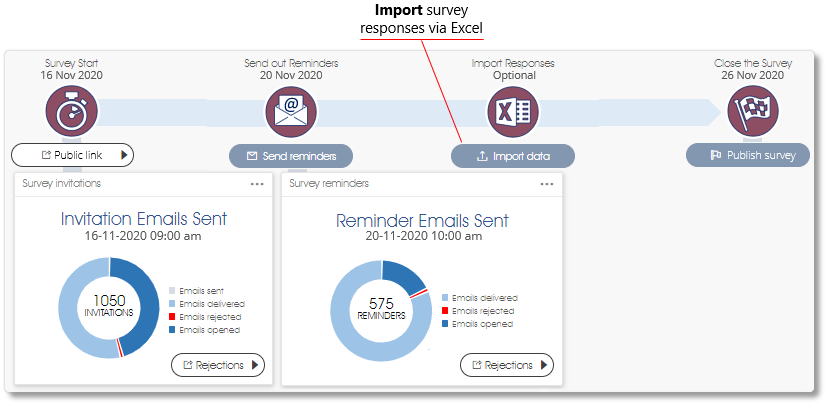
Closing the survey will result in all online survey links being suspended and a closure message displayed when someone clicks on the survey link. A survey that has been closed cannot be re-opened or relaunched, so please make sure that everyone who should have responded, has done so. Also, make sure that any paper-based or external survey responses (if any) have been captured and/or imported before you close the survey. Use the dedicated URL link to capture paper-based survey responses - see Manage a Campaign for more.
Importing Additional Survey Responses
Click on the Import survey responses button on the survey participation dashboard to import an Excel file with additional survey responses.
Select the Excel file to be imported by clicking in the square box to open a File Open dialogue window and selecting an Excel file with a *.xlsx file extension to be imported, or drag and drop the file onto the square box.

The Excel file must be structured with column headings that match the survey model's survey questions and demographic categories as defined, so download an Excel import template with the necessary column headings by clicking on the Download import file button.
The survey responses should be captured in rows in the Excel file, with each respondent's responses in a separate row. The columns in the Excel file should be used for one of 3 types of survey data:
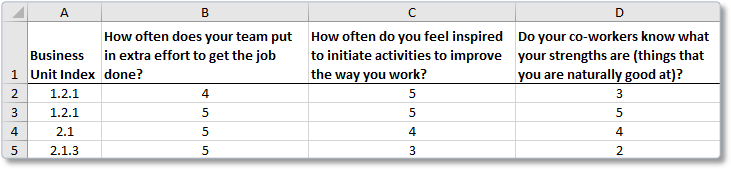
- Business unit index – include unique decimal business unit index number for all respondents, indicating the business unit to which the responses should be mapped (see Organization Structures for more).
- Survey questions – the exact wording of a survey question should be included in the first cell of the column, including question marks where relevant. The survey responses should be included in the appropriate format in subsequent cells, e.g. numbers 1 - 5 for a 5-Likert multiple choice or dropdown question, or a text string for an open-ended survey question.
Please note that survey question text that do not match the exact wording of the survey question as defined in the Engage SURVEY module, will be flagged as an error and will prevent the file from being imported. Incorrect survey responses will also be flagged as an error, e.g. a text string instead of a number for a Likert survey question.
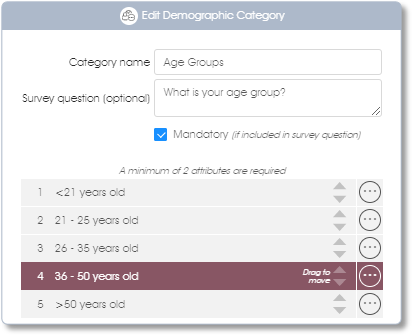
Also note that responses should be included for all respondents in case of compulsory survey questions; responses can however be left out in case of non-compulsory survey questions. - Demographics – the Demographic Category name should be included in the first cell of the column, and should match the spelling and capitalization as defined via the Manage PARTICIPANTS module, e.g. Age Groups (as shown below). The demographic attributes should be included in subsequent cells either (1) as the full attribute description, spelled exactly the same as defined in the system (e.g. 21 - 25 years old), or (2) as an option number (2 instead of 21 - 25 years old; 4 instead of 36 - 50 years old). Demographic attributes are not compulsory, so cells can be left blank.
After you have selected the Excel file to be imported by selecting or dragging a file onto the square box, the Excel import dialogue will be displayed:
| 1. | Load an Excel file – the name of the Excel file that is to be imported will be displayed in the box. Click on the box to select and load a different Excel file, or drag the Excel file onto the box. |
| 2. | Select the Excel tab – select the Excel tab that should be loaded (if the Excel file has more than one tab with data). |
| 3. | Map fields for importing – map the Excel columns to corresponding fields by selecting a data field from the dropdown for each of the Excel columns. |
| 4. | Excel column headings & data – the column headings of the Excel file will be displayed and beneath them the first 6 rows of data. If required, use the scroll bar to scroll to the right to view the rest of the Excel columns. |
| 5. | Select the field – fields that have already been selected for mapping will be marked with a green tick mark. To ignore a field, simply select the <Ignore> option. Excel columns to be included in the import should be marked as one of the following field types: • Business Unit Index – column with the respondent's business unit index (only one can be selected); • Question – flag a column to be imported as a survey question (multiple columns can be selected); • Demographic – flag a column to be imported as a demographic (multiple columns can be selected). |
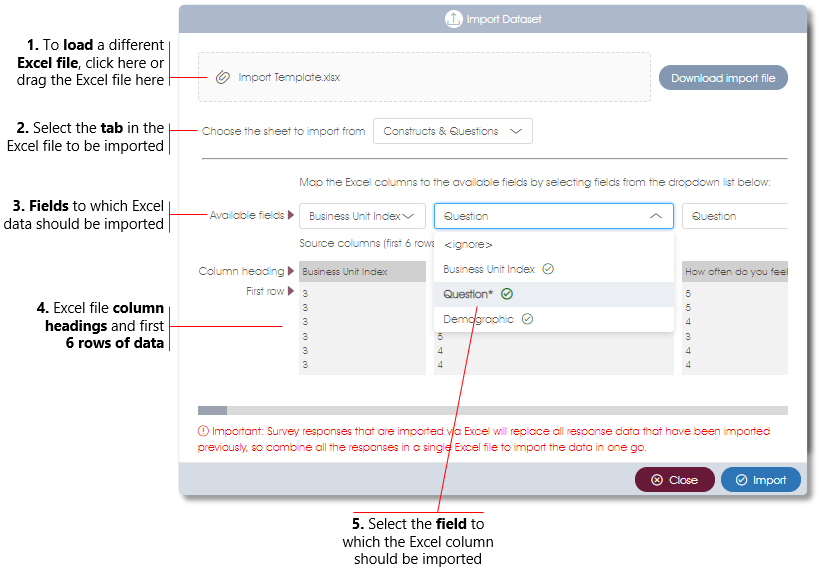
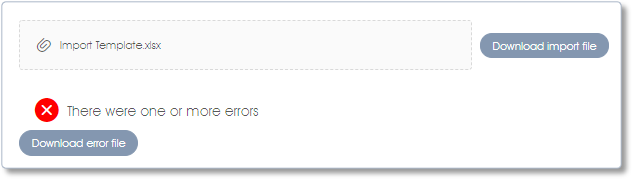
When you are done, click on the Import button to import the survey responses. If successful, statistics regarding the number of survey responses that were imported will be displayed. If the Excel file contained any errors, the import will be suspended and an error message will be displayed (see below). Click on the Download error file button to download an Excel file with the cells that contain errors flagged in red. Fix the errors and try to import it again.
Closing the Survey
Click on the Publish survey button on the survey participation dashboard to close the survey.
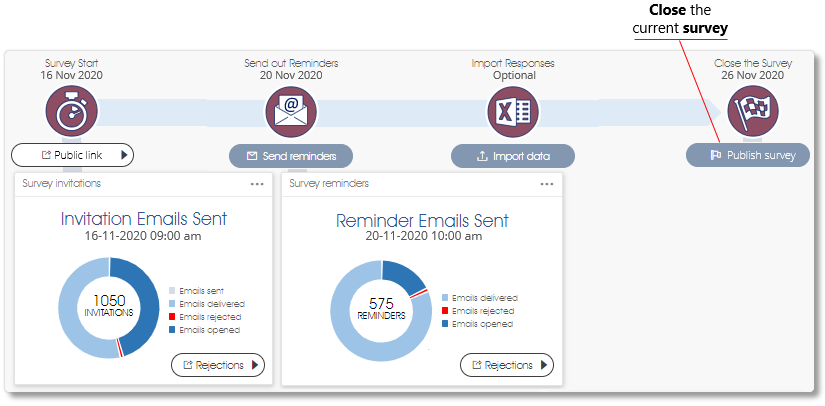
A checklist similar to the survey launch checklist will be displayed (see Launching Survey Campaign for more on this).

Closing and publishing the survey cannot be undone, so please confirm the following before you click on the Publish survey button:
- Check that the software subscription license is still valid;
- Confirm that you are satisfied with the survey participation rate and that the sampling error is within an acceptable range (i.e. below 5%);
- Ensure that all paper-based responses (where applicable) have been captured via the kiosk link;
- Additional survey responses have been imported (see Importing Additional Survey Responses above).
Preparing to view the Results
Once the survey has been closed the analyzed results are available, to authorized viewers only, via Engage ANALYTICS or Engage INSIGHTS. See User access and Edit/View rights for instructions on updating the Manage PARTICIPANTS entries for the managers and/or other employees who will view the analysed results.
Republishing the Survey Results
Changes to the employee list and organizational structure can still be made after the survey has been published, including changes to business units (e.g. name changes, repositioning/moving of business units) and employee transfers between business units.
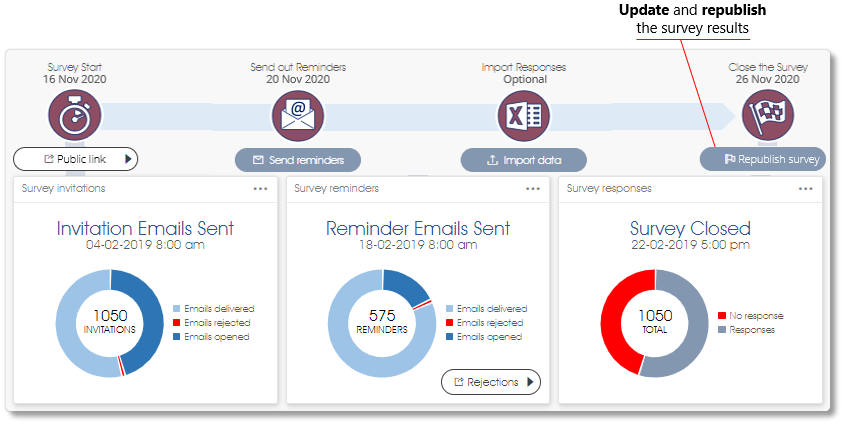
Click on the Republish survey button to archive the original survey results and to update the analytics dashboard with the survey results mapped to the current organizational structure.
Important: survey results cannot be republished if employee records have been deleted via the Manage PARTICIPANTS module after a survey has been closed, since the system will not know what to do with the survey responses of the deleted employees.
| For more information, click on a sub-menu item at the top of the page⇑ or in the right margin⇒ |