
Survey or assessment response data can be displayed on any of the Engage ANALYTICS pages by:
(1) selecting a dataset (ie. the model and current survey or assessment - see the section on Selecting the Dataset below for detailed information), and
(2) setting one or more of the following filters:
- Business units – select one or more business units and sub-units, e.g. the 2.1 Warehousing Operations division as well as the 4.2 Chilled & Frozen Foods unit. The default setting will be Organization, i.e. the survey results of all the business units will be displayed by default.
- Engagement level – this filter will only work with the Engaged@Way-of-Work engagement survey and will allow you to selectively display the survey results of all respondents at a particular engagement level. The default setting is All engagement levels, so the survey results of all respondents will be displayed regardless of how engaged they are.
- Demographics – display the survey results of all respondents who meet the selected demographic criteria, e.g. all respondents who have been with the organization for 1 to 5 years at the Operational/staff job level; the default setting will be OFF so the survey results of all employees will be shown.
The status of the current filter settings will be displayed in the side panel: filters with active settings will be highlighted in red, and for the demographic filter the burgundy ON button will be displayed. See the Survey Analytics Concepts section for more on structuring a survey according to business units or working with demographic data.
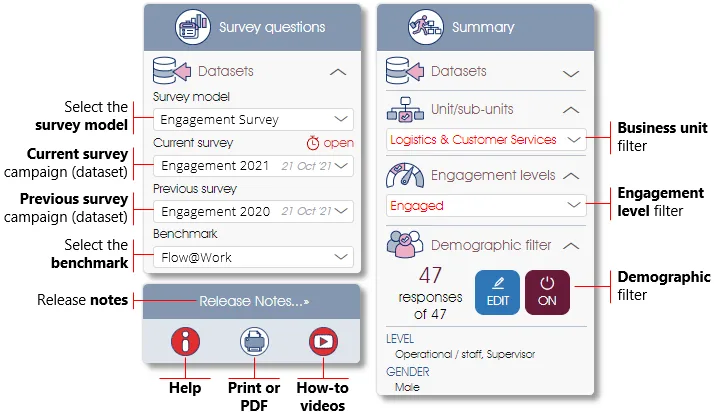
Selecting the Dataset
The Datasets toolbox function in the side panel will allow you to select a survey or assessment model and associated datasets for display via Engage ANALYTICS:
- Survey or assessment model – select the model from the dropdown list (e.g. Culture or Engagement Survey).
- Current survey or assessment – select a dataset (published or open campaign) that will be displayed as the default current survey. Note that an open (stop-watch) icon (as depicted in the image above) will be displayed should an open campaign or assessment project be selected.
- Previous survey or assessment – (not applicable to Engage INSIGHTS) select a dataset, published or open, that will (where applicable) be displayed for comparison purposes as the previous survey.
- Benchmark – (not applicable to Engage INSIGHTS) select a benchmark (if available) from the list.
See Survey Models/Datasets for more.
Setting a Unit & Sub-unit Filter
To selectively display the survey responses of any arbitrary combination of units and sub-units, e.g. regions, departments, divisions, teams (see Organizational Structures for more on the use of organizational structures in surveys):
| 1. | Open filter window – to open the Unit/sub-unit Filter window, simply click on the business unit dropdown field at the top of the screen or in the side panel. |
| 2. | Survey respondents – (not applicable to Engage INSIGHTS) the number of survey respondents (survey sample size) who fall under the selected (filtered) unit/sub-unit combination will be displayed in the side panel under the Demographic filter heading. |
| 3. | Total employees – (not applicable to Engage INSIGHTS) the total number of employees (survey population) of the selected (filtered) unit/sub-unit combination will also be displayed in the side panel. |
| 4. | Switch between Actual & Virtual Structures – select the Actual option to view the selected survey's results mapped to the organizational structure as captured via the Actual Structure function in the Manage Participants module (see Actual Org Structure for more on this), or the Virtual option to display the survey results mapped to the selected Virtual Structure (see Virtual Structures for more on this). |
| 5. | Switch between Current & Historic Views – select Current to view the current survey's results mapped to the current version of the organizational or virtual structure as selected (see 4 above), or Historic to view the survey results mapped to the way the business units were structured in the Actual or Virtual Structure at the time when the survey was conducted. |
| 6. | Expand/collapse – business units with sub-units reporting to them will have down/up arrows next to their names; click on the arrows to expand or collapse the sub-units. |
| 7. | Select/deselect – select to include, or deselect to exclude, a business unit from the Unit/sub-unit filter. Selecting a business unit with sub-units will automatically select the sub-units as well. |
| 8. | Close – click on the Close button to close the window. |
| 9. | Clear – click on the Clear button to deselect all the business units that are currently selected. |
| 10. | All – click on the All button to select all the business units; selecting the Organization unit will have the same effect. |
| 11. | Apply – click on the Apply button to apply the selection and to update the analytics dashboard. |
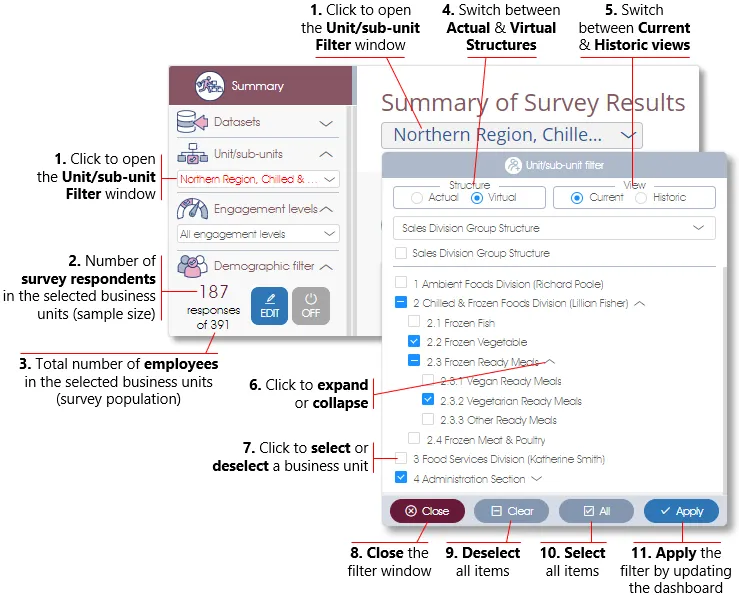
| Please note that the Virtual Structures module is only available for users with a Premium Plan license. |
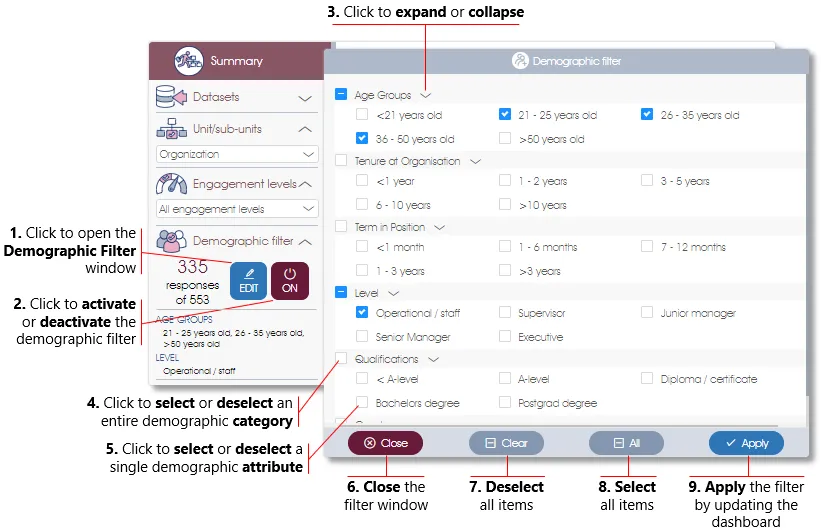
Setting a Demographic Filter
The Demographic Filter function will allow you to selectively display the survey results of any arbitrary permutation of demographic data, e.g. all the Operational /staff respondents in the 21 – 50 age group (see Demographic Data for more on the user of demographics in surveys). The number of respondents who meet the demographic filter criteria will be displayed in the side panel under the Demographic Filter heading, followed by the selected demographic categories and attributes.
| 1. | Open filter window – to open the Demographic Filter window, click on the EDIT button in the side panel. |
| 2. | Activate/deactivate filter – click on the ON/OFF button to activate or deactivate the demographic filter. |
| 3. | Expand/collapse – click on the arrows to expand or collapse a demographic category. |
| 4. | Select/deselect category – click on the demographic category check box to select or deselect all the demographic attributes of a demographic category. |
| 5. | Select/deselect attribute – click on the demographic attribute check box to select or deselect a specific demographic attribute. |
| 6. | Close – click on the Close button to close the window. |
| 7. | Clear – click on the Clear button to deselect all the demographic categories and attributes that are currently selected. |
| 8. | All – click on the All button to select all the demographic categories and attributes. |
| 9. | Apply – click on the Apply button to apply the selection and to update the analytics dashboard. |
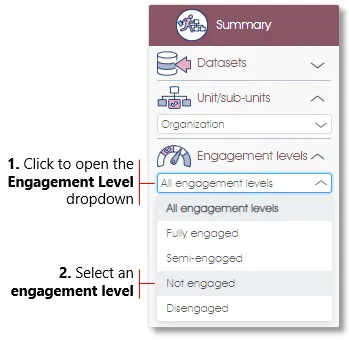
Setting an Engagement Level Filter
The Engagement Level filter will allow you to selectively display the survey results of all respondents at a particular engagement level. Please note that this filter will only be available if the Engaged@Way-of-Work engagement survey was used as the basis of the survey (see Engaged@Way-of-Work Survey Model for more on how engagement levels are calculated).
| 1. | Open the Engagement Level dropdown – click on the Engagement level field to open the Engagement Level dropdown window. |
| 2. | Select an engagement level – click on one of the engagement levels to select it. |
Anonymity Threshold and Confidentially
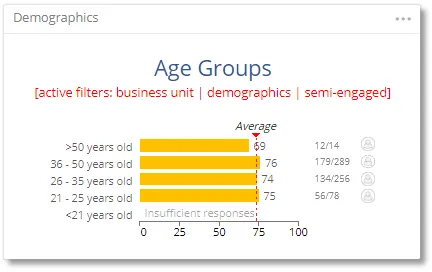
To protect the anonymity of survey and assessment respondents, the analytics dashboard will display only aggregated results of groups that equal or exceed the minimum values set in the client's Analytics anonymity threshold (see Setting the Anonymity Threshold for Reports for more). The only exception is non-anonymous surveys, where the Anonymous Survey toggle was deselected when the survey model was defined (described in the section Creating a new survey model). The anonymity threshold also applies when business unit(s) have been selected and/or demographic filter(s) have been set. It will impact all graphs and tables displaying assessment or survey scores, such as the Engagement Indicator scores for the Age demographic category on the Summary page.
Setting the Anonymity Threshold for Reports
Before viewing survey or assessment reports, the client's Mindset Client Profile must be updated with the client's anonymity parameters if they differ from the default values. Typically, this update is performed by the client's Mindset Partner.
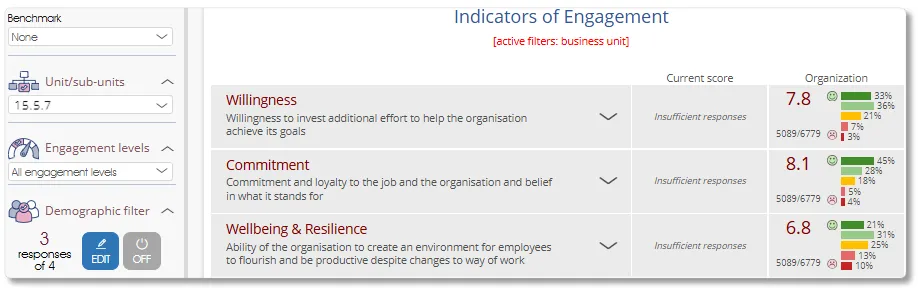
As an example, if the anonymity is based on Responses and the minimum for Likerts has been set to 4, the results for business unit 15.5.7 are replaced with the text Insufficient responses (i.e. not displayed) as there were 3 responses (from 4 participants), which is below the minimum of 4 Likert responses set as the anonymization threshold:
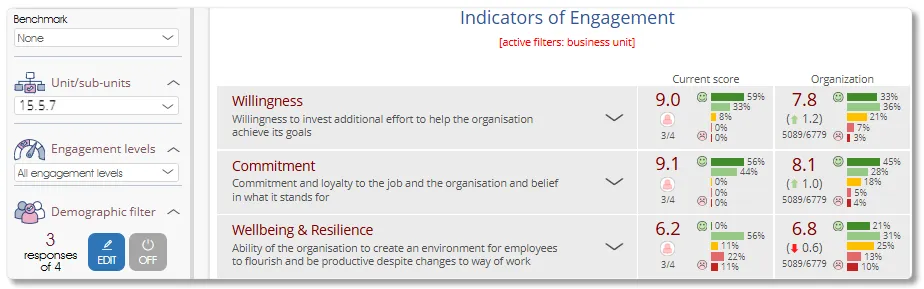
Conversely, the results for business unit 15.5.7 are displayed if anonymity is based on Participants, because (3 responses from) 4 participants meet the minimum requirement of 4 Likert participants.
| For more information, click on a sub-menu item at the top of the page⇑ or in the right margin⇒ |