The public mapped super-easy engagement survey described in this tutorial is probably the easiest and fastest fully-fledged engagement survey that can be done:
- Get your team – or anyone else for that matter – to participate in an employee engagement survey, with all online respondents getting the opportunity to view and download their own personalized engagement reports;
- Include the survey link in your own email and forward it to anyone at your discretion;
- Map survey responses to business units so you can track engagement at business unit and team level;
- Define demographic categories (e.g. gender, age) so you can compare and analyse survey results based on demographic attributes;
- Use the Engaged@Way-of-Work engagement survey as-is, or edit or add your own survey questions as required; and
- See the survey results in the analytics dashboard the moment you close and publish the survey.
Setting the Scene
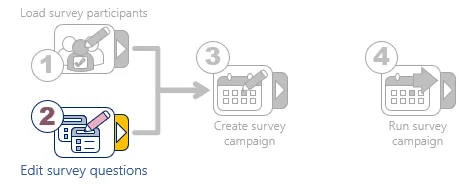
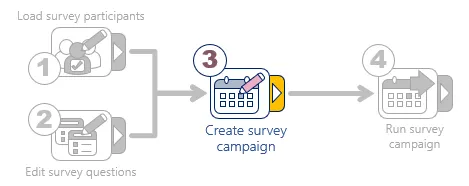
The Public Mapped Surveys tutorial follows more-or-less the same steps as the Super-easy Public Survey tutorial, except for Step 1: Load Survey Participants, where you will be shown how to define business units and demographic categories, and a couple of minor additions to Steps 2 and 3, all highlighted with red MUST DO (additional) labels in the remainder of the tutorial – in case you want to use the Super-easy Public Survey tutorial video as guideline.
|
(8.11 minutes)
Tutorial 1: Super Easy Public Surveys
Step-by-step instructions on how to get going with a super-easy employee engagement survey
|
But before you can get started with the survey, you will first have to register a trial license. If you haven’t done so yet, click on the Get Started button below or elsewhere on the Mindset website, complete the details, and register your account!
| Register a free trial license for a survey of up to 30 employees |
GET STARTED |
Step 1: Load the survey participants
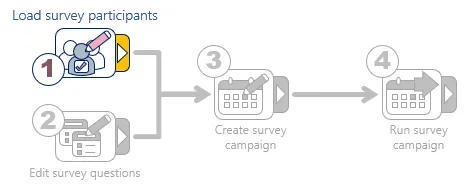
Since the tutorial describes a public survey, it will not be necessary to load or import the details of individual employees. This step, however, will allow you to define business units and some demographic categories so the survey results can be accordingly mapped and analyzed in the analytics dashboard.
|
MUST DO
(additional)
|
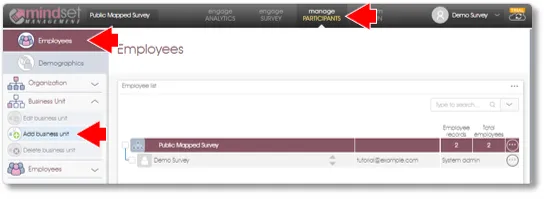
Define a business unit hierarchy
|
| |
A business unit structure that is aligned with your organizational hierarchy can be imported via Excel - which will be particularly useful if it can be extracted from your HR system. Importing an Excel file is however beyond the scope of this tutorial, so please see the Import Organization section of Manage Participants > Organization Structure for more details on how to structure and import business units via Excel.
This tutorial will explain how you can manually insert and structure business units into a hierarchy by means of the Manage PARTICIPANTS module - see the Survey Concepts topics Organization Structures and Business Unit Results for more on business unit hierarchies.
- Navigate to the Manage PARTICIPANTS module, and click on the Employees menu item in the side panel.
- Add a new business unit by clicking on the Add business unit toolbox function in the side panel, or by dragging-and-dropping it to the desired location in the employee list.
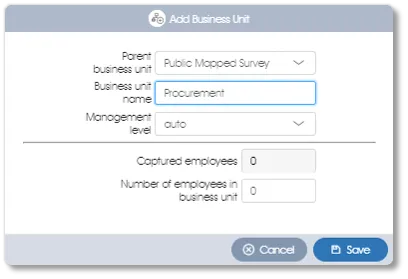
- A dialogue window where the new business unit’s details can be captured, will be displayed. Enter the business unit's name (e.g. Procurement), and type in the number of employees for the business unit - or leave it blank if you are planning to add sub-units to the business unit. Click on the Save button. A business unit with a decimal index numbering notation will be created, starting from "1".
- To add a sub-unit to the 1. Procurement business unit, select the business unit with the mouse (it should be highlighted in burgundy), and then click on the Add business unit toolbox function in the side panel, or drag it to the desired location in the employee list.
- Enter the business unit's name (e.g. General) and the number of employees (assuming the business unit will not have any sub-units), and click on the Save button.

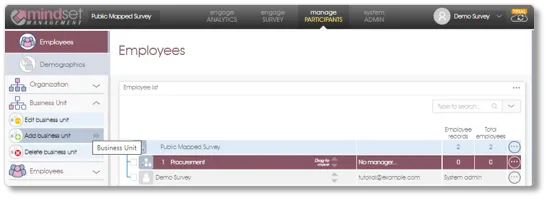
- A sub-unit 1.1 General will be created. To add more business units and/or sub-units, just repeat the process - taking care to first highlight the business unit where you want to add the new business unit.
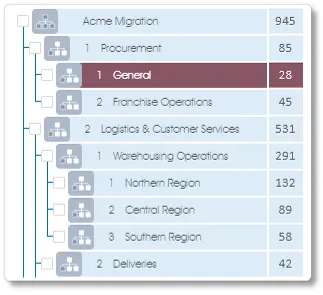
Capture the number of employees at business unit level as accurately as possible. The system will automatically aggregate sub-unit totals to the next higher level, but you can inflate the next level's total to make provision for additional employees at that level (e.g. in the example above, the 1. Procurement business unit has 12 staff members, resulting in a total of 85 if you add the staff members of 1.1 General and 1.2 Franchise Operations).
Note about business unit totals: the number of employees per business unit will be used to calculate the sampling errors of the survey responses to determine whether the number of survey responses would from a statistical point of view be sufficiently representative of the business units being surveyed - see Sampling Size & Errors for more.
|
|
MUST DO
(additional)
|
Define one or more demographic categories
|
|
Including demographic data in a survey will make it possible to drill down and analyze segments or sub-groups of one or more business units to see results specific to a particular demographic grouping e.g. males versus females. Demographic categories should, however, be chosen with care and for a specific purpose – see Demographic Data for more.
Follow the steps as outlined below to define one or more demographic categories:
- Navigate to the Manage PARTICIPANTS module, and click on the Demographics menu item in the side panel.
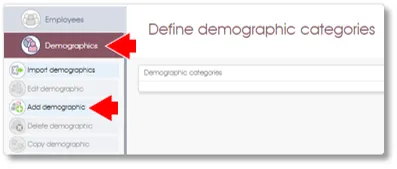
- Add a new demographic category by clicking on the Add demographic toolbox function in the side panel. A dialogue window where the demographic category’s details and different attributes can be captured, will be displayed. Enter the Category name (e.g. Age Groups) and a Survey question that can be included in the online survey questionnaire to collect demographic data from respondents.
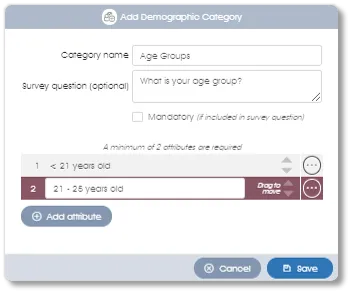
Enter a description or label for the first demographic attribute, and click on the Add attribute to add a second and more attributes. There should be at least 2 attributes per demographic category. Click on the Save button when you are done.
- Repeat the process to add more demographic categories. See Demographic Data for some examples of demographic data and for more information on how demographics are dealt with in the analytics dashboard.
|
Step 2: Copy the Engage@Way-of-Work survey model
This step will allow you to use the Engage@Way-of-Work (previously Flow@Work) engagement survey as-is, or to make changes to the survey model and questions as required.
|
MUST DO
|
Create a copy of the Engage@Way-of-Work survey model
|
| |
Create your own copy of the Engage@Way-of-Work engagement or wellbeing survey model template that you can edit and change as required. To do this, navigate to the Engage SURVEY | SURVEY MODEL module:
- Click on the Survey template menu item in the side panel; a list of survey templates will be displayed.
- Copy the Engage@Way-of-Work engagement or wellbeing survey by clicking on its Copy button:
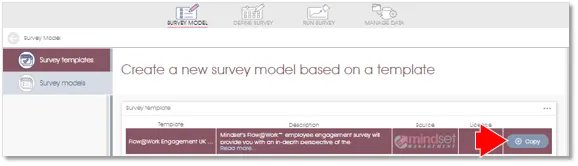
- Type in a suitable name for the survey in the dialogue window that will come up (e.g. Engagement survey), and select Organization as the survey model owner from the dropdown:

|
|
MUST DO
(additional)
|
Add demographic questions to the survey questionnaire layout
|
|
If you have added demographic categories in Step 1, it will make sense to include related demographic questions in the online survey questionnaire so respondents will be prompted to provide their demographic details. To add the demographic questions:
- Click on the Survey models menu item in the side panel, and double-click on the name of the survey model that you have created in the previous step to edit it (or select it and click on the Edit survey model toolbox function in the side panel or the dropdown menu):
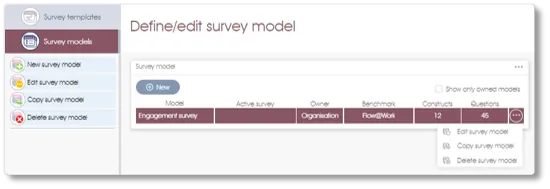
- The survey model will be loaded, and the toolbox functions in the side panel will be updated. Click on the Diagnostic survey toolbox function to open the survey questionnaire editor:

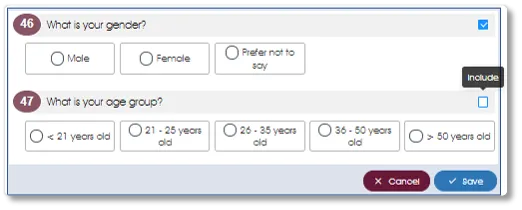
- Scroll down and expand the Demographics page (2nd one from the bottom) by clicking on it. An introduction paragraph will be displayed, as well as a list of all the demographic categories that you have added in the previous step. To select the demographic questions that you want to include in the survey questionnaire, click on the Edit content option next to the demographic questions (see the red arrows in the illustration below):

And then include the demographic questions by selecting their check boxes, and click on the Save button when you are done:
|
|
OPTIONAL
|
Edit the survey questionnaire layout
|
|
The system has automatically generated an online survey questionnaire layout that can be used as-is, with no editing required. You can, however, edit the survey questionnaire as you see fit by adding your own logos and branding, changing the introduction paragraph text, moving the survey questions around etc.
See Survey Questionnaires on how to edit the online survey questionnaire layout.
|
|
OPTIONAL
|
Edit or add survey questions
|
|
Mandatory Engage@Way-of-Work engagement survey questions that should not be deleted or substantially changed will be marked with a yellow lock symbol (see Copy a Survey Template for more on this). You are however free to add additional survey questions to an existing construct, or even to add your own custom constructs to the survey (e.g. to measure Diversity & Inclusion or Values).
See Constructs & Questions on how to edit or add survey constructs and questions.
|
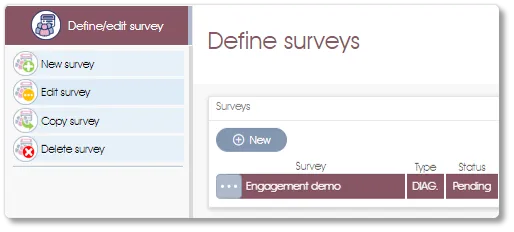
Step 3: Create a survey campaign
Define a survey campaign based on the survey model that you have created in the previous step, and test the survey link (if required).
|
MUST DO
|
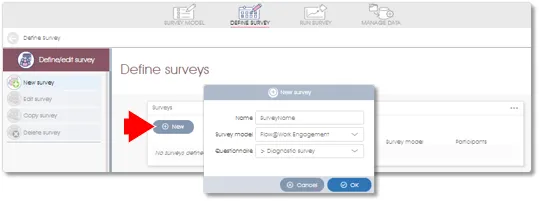
Create a survey campaign
|
| |
Use the Engage@Way-of-Work survey as the basis for the survey. Navigate to the DEFINE SURVEY module – a window with a list of the available survey campaigns will be displayed (if any):
- Click on the New button to create a new survey campaign.
- Enter a name for the survey campaign, e.g. 2019 Engagement Survey, and select the Survey model (select the copy of the Engage@Way-of-Work survey that you created in Step 2) and Survey questionnaire (select the default > Diagnostic survey) from the dropdown fields, and click on the OK button to save the changes.
|
|
MUST DO
(additional)
|
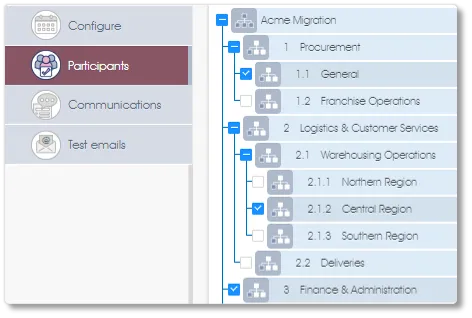
Select the survey participants
|
|
The system will allow you to select the entire organization or any permutation of business units to participate in the survey. Since no participants will by default be selected, follow the steps as outlined below to select one or more business units to participate in the survey campaign:
- Double-click on the name of the survey campaign that you have created in the previous step to edit it (or select it and click on the Edit survey toolbox function in the side panel or dropdown menu):
- Select the Participants toolbox function in the side panel; the business units as defined in Step 1 will be displayed. To select the entire organization, click on the check box at the top of the list, or select individual business units by checking the boxes next to their names.
|
|
IGNORE
|
Editing the survey communications (emails)
|
|
Since this is going to be a public survey where you email the survey links out yourself, and not a targeted survey where you preload the employee details so the system can send the survey emails, it would not be necessary - or make much sense - to edit the survey email content, so you can skip this step.
PS. Emailing the survey links are covered in more detail in Step 4 below.
|
|
MUST DO
|
Test the survey link
|
|
Testing the survey is good practice, for a variety of reasons. It will allow you where applicable to:
- Check the layout, appearances and flow of the online questionnaire, particularly with respect to logos, branding and the use of colors;
- Get management or the responsible stakeholders to approve and sign off on the online questionnaire;
- Check whether there are any whitelisting or firewall restrictions that may prevent the emails from reaching their destinations;
- Confirm that employees in outlying and more remote areas have adequate and reliable internet access so they can complete the online questionnaire.
See Managing Test Emails for more on how to test your survey link.
|
Step 4: Run the survey campaign
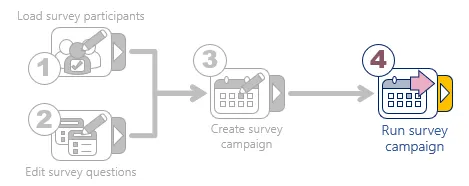
Run the survey campaign, monitor the survey participation rates in real time, and view the survey results in the analytics dashboard when done. Please click here for more information on what you can do to maximize survey participation.
|
MUST DO
|
Start the survey campaign
|
| |
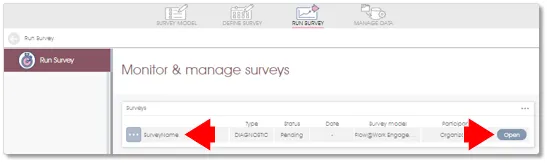
Navigate to the RUN SURVEY module – a window with a list of the available survey campaigns will be displayed.
- Double-click on the survey campaign name, or click on the Open button to get started with the survey campaign.
- The Run Survey screen will come up. Click on the Start survey button to start the survey campaign. A checklist that summarizes the status of the different components of the survey campaign will be displayed:
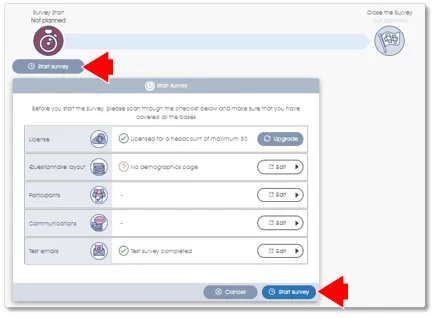
- There should not be any hard-stop warning messages in the checklist, so click on the Start survey button to launch the survey. See Launch Survey Campaign for more on the survey checklist.
|
|
MUST DO
|
Copy and email the survey link
|
|
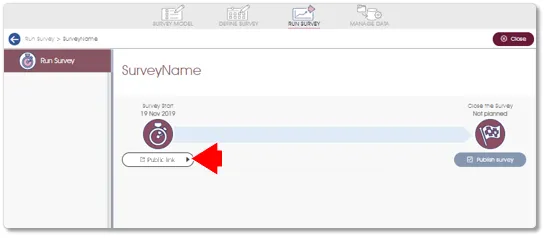
The survey participation dashboard will come up:
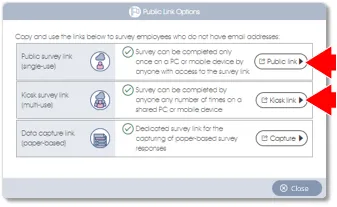
- To get a public URL link for the survey that you can forward via email to the intended survey participants, click on the Survey link button.
- A dialogue window with a number of Survey Link options will come up. The Public survey link (single use) option will provide you with a survey link that will allow survey participants to complete the survey only once on a particular device, so use this link if the participants have access to their own PCs or mobile devices.
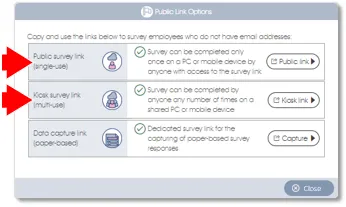
Use the Kiosk survey link (multi-use) instead if you need a survey link that can be used more than once on the same PC or mobile device - this will allow you to make the survey link available on one or more share PCs or mobile devices so participants who do not have access to their own PCs or mobile devices can also complete the survey.
- To copy the survey’s URL link, click on the appropriate Public link or Kiosk link button:
A window will come up with a unique URL link for the survey; highlight and copy the URL link by clicking on the Copy button:
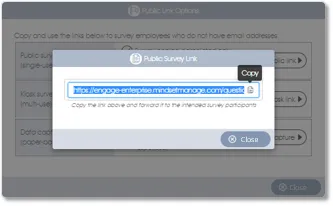
- Paste the URL link into your own email, and forward the email with the link to all intended participants. Please note that anyone who have access to the email and/or the survey link will be able to complete the survey, so forward the email link at your discretion.
For more about announcing and communicating the survey, please see The Survey Process.
|
|
MUST DO
|
Monitor survey participation
|
|
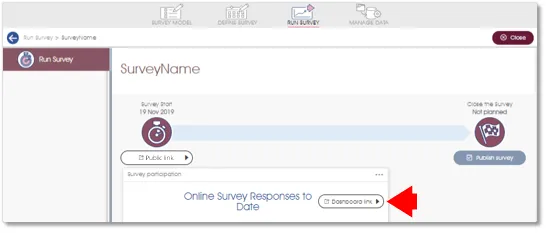
The survey participation dashboard will be updated in real-time with the number of survey responses. To access a view-only link of the survey participation dashboard that you can forward to other interested parties:
- Click on the Dashboard link button.
- A view-only version of the dashboard will come up; copy this link and forward this to anyone else who would like to monitor survey participation.
|
|
MUST DO
|
Close and publish the survey
|
|
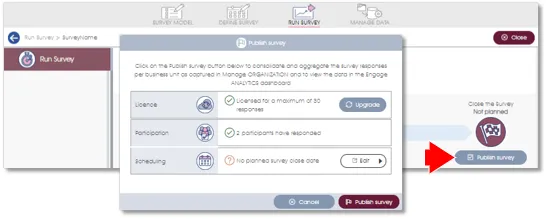
You can close and publish the survey when you have received sufficient survey responses. To close the survey:
- Click on the Publish survey button in the survey participation dashboard. A dialogue window will come up with a summary of your license permissions and the number of survey responses.
- Click on Publish survey button at the bottom of the Publish survey dialogue to close and publish the survey results on the analytics dashboard.
The survey links will be closed and deactivated, and the survey responses will be anonymized and loaded in the analytics dashboard. The analytics dashboard will be automatically opened in a window in your browser so you can view your survey results.
See the Engage ANALYTICS help file for more (click here).
|
| For more information, click on a sub-menu item at the top of the page⇑ or in the right margin⇒ |