
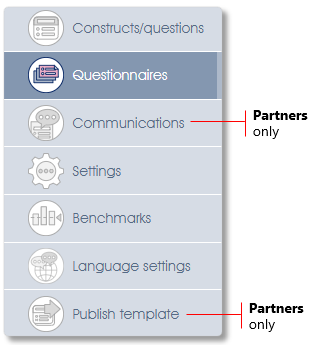
The Questionnaires, Diagnostic survey or Pulse survey sub-menu items will allow you to define or manage the online questionnaire layouts associated with the selected model. Please note that for each assessment or survey model, there can be any number of assessment or pulse survey questionnaires, respectively, but only one diagnostic survey questionnaire can be created for each survey model.
Clicking on the Diagnostic survey sub-menu item will automatically trigger the Create questionnaire function if a diagnostic questionnaire does not exist or the Edit questionnaire function if it does.
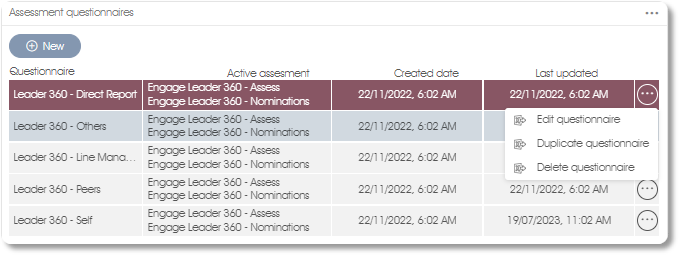
Clicking on the Questionnaires or Pulse surveys sub-menu item displays a list of existing questionnaires associated with this model:
Adding or Editing Questionnaires
 |
 |
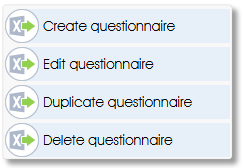
All these toolbox functions are available for assessment and pulse survey questionnaires. Only the Create questionnaire and Edit questionnaire functions can be used for diagnostic survey questionnaires.
 |
Create a new questionnaire |
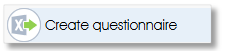
Clicking on the Create questionnaire toolbox function in the side panel or the +New button in the work area opens the following dialogue window:
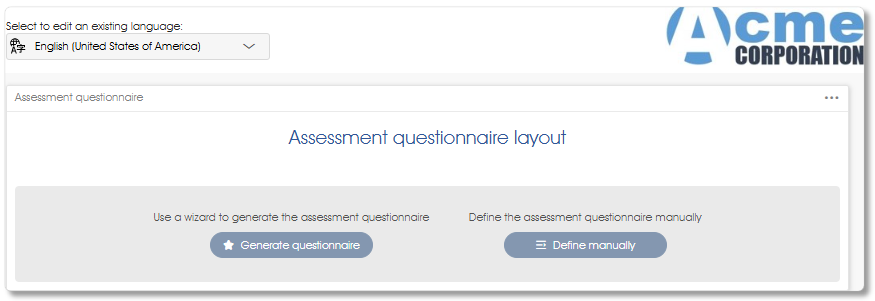
Questionnaire layouts can be created manually or with the aid of the Questionnaire layout wizard. A name, distinct from those already assigned to questionnaires associated with the current model, is automatically assigned to the questionnaire during creation.
Generating the Questionnaire via a Wizard
Clicking on the Generate/regenerate questionnaire buttons will open a dialogue window where the questionnaire layout wizard’s design parameters can be set. You can rerun the questionnaire layout wizard at any later stage by clicking on the Regenerate questionnaire button. Please note: rerunning the wizard will replace the current questionnaire layout with the wizard-generated layout.
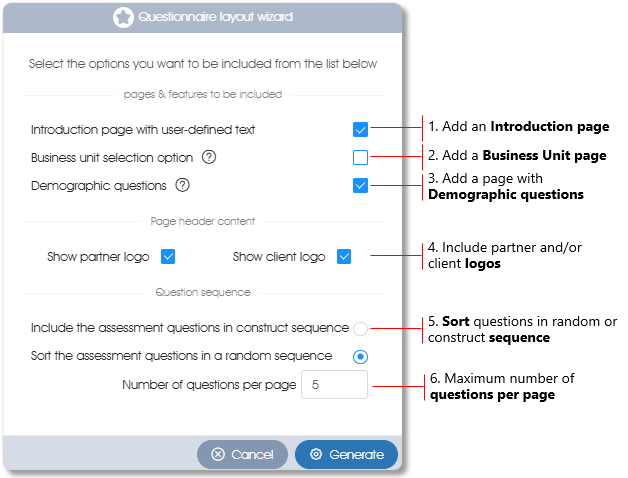
| 1. | Introduction page – include a custom introduction page as the first page of the questionnaire. |
| 2. | Business unit – a business unit selection mechanism, consisting of one or more dropdown fields allowing the respondents to select their business units and sub-units, is to be added to the questionnaire. This option will only be necessary in cases where the participants’ business unit affiliations cannot be obtained from Manage PARTICIPANTS. |
| 3. | Demographic questions – include demographic questions in the questionnaire. This option will only be necessary in cases where the participants’ demographic data cannot be obtained from Manage PARTICIPANTS. |
| 4. | Partner and/or client logos – include the Partner's and/or Client’s logos in the header section of the questionnaire layout. The logos can be subsequently edited or changed, or they can be manually inserted via the Logos toolbox function. |
| 5. | Sort questions – the questions can be included in the questionnaire, in either construct sequence with each construct starting on a new page, or randomly placed on the question pages. Direct the wizard to include the questions in the desired sequence by selecting the appropriate option. |
| 6. | Number of questions per page – specify the maximum number of questions per page. Please note that this option will only be available if the random sequence has been selected (see previous point). |
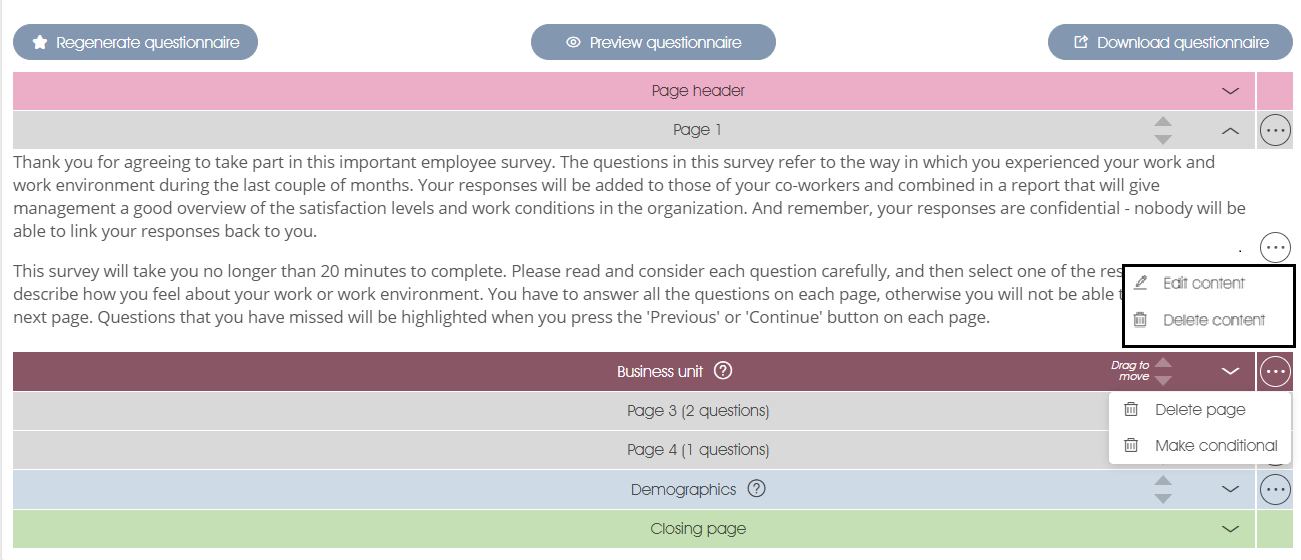
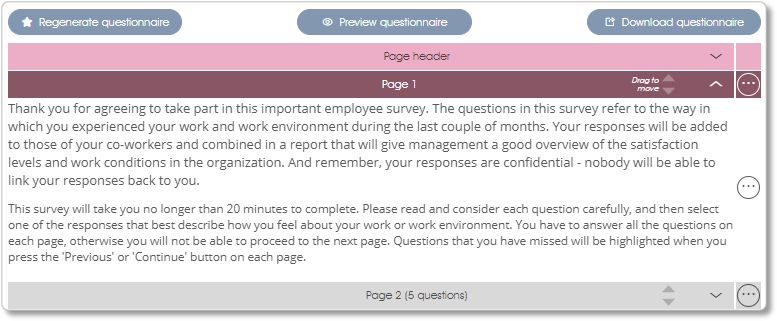
After clicking the Generate button the newly created questionnaire will be displayed in the work area:
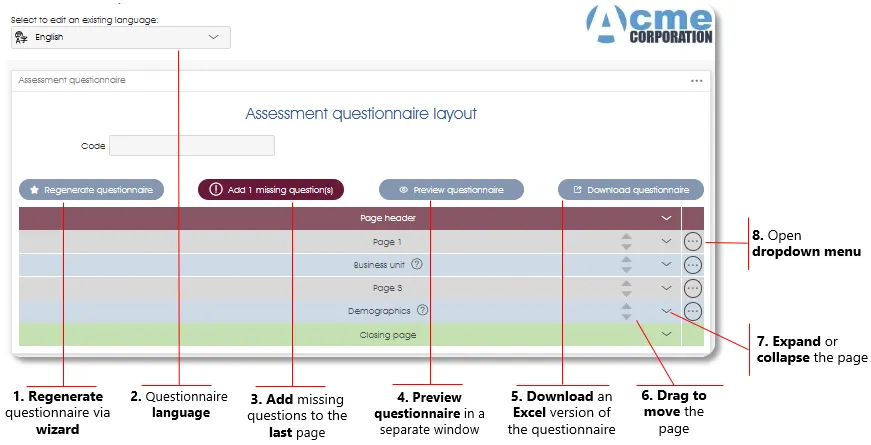
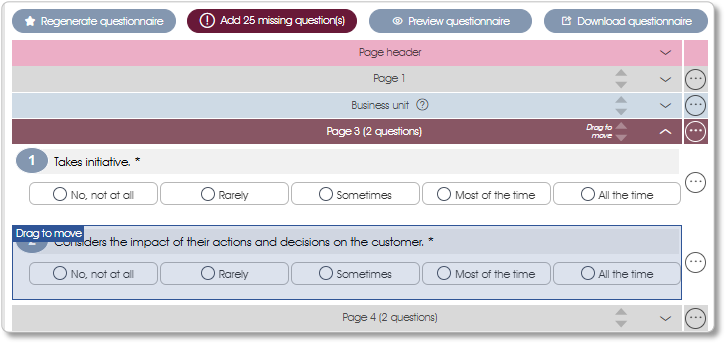
| 1. | Regenerate questionnaire – generate or regenerate a questionnaire using the Questionnaire layout wizard. The Overwrite questionnaire layout pop-up window warns that the existing questionnaire layout will be overwritten and requests confirmation before continuing. Please note that all user-defined content, including conditional branching, custom text, employee fields, among others, will be lost by regenerating the questionnaire. |
| 2. | Questionnaire language – the language of this questionnaire. Models are created in a default language (usually English - United States of America) and may have versions in additional languages (see Associating languages with models for more on this). |
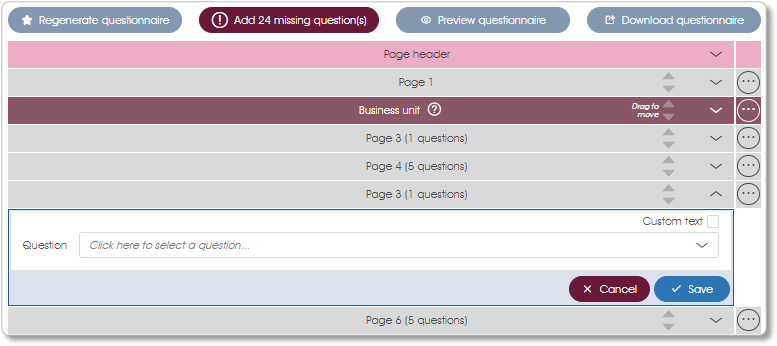
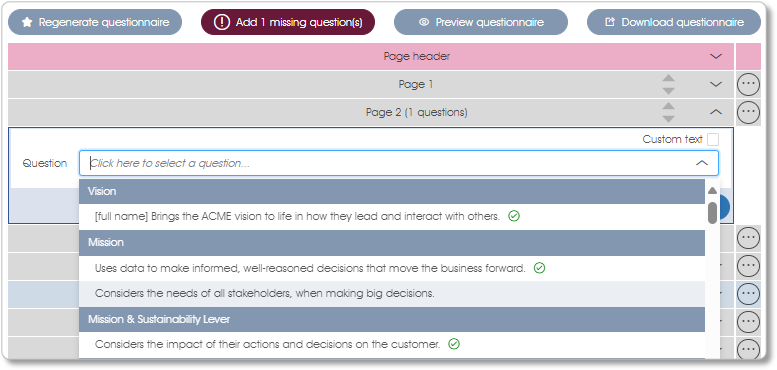
| 3. | Add missing questions – if it is present, an Add x missing question(s) button will highlight the fact that not all the questions in the model have been included in the current questionnaire layout. Ignore this button/message if the questionnaire is intended to include only a subset of the questions or click the button to automatically insert the missing questions into a new page that will be added just before the questionnaire’s Closing page. Alternatively, insert the questions manually into the required pages via the Add question toolbox function. |
| 4. | Preview questionnaire – click the Preview questionnaire button to see what the questionnaire will look like on a laptop, PC or mobile device. |
| 5. | Download questionnaire – clicking this button allows you to download the current questionnaire layout to an Excel file, with the questions in the same sequence as in the online questionnaire. The Excel version can be edited, logos and branding added where required, and printed to be used as the basis of a paper-based questionnaire. |
| 6. | Drag to move – click on the appropriate up/down triangle and drag the page in the same direction until the orange line is displayed in the page's desired new location. |
| 7. | Expand/collapse – click the collapse icon (down arrowhead) to hide the contents of a page, the expand icon (up arrowhead) displays the page contents. |
| 8. | Click to open the dropdown menu – functions that operate on only the selected page are located on the dropdown menu. |
Creating a Questionnaire Manually
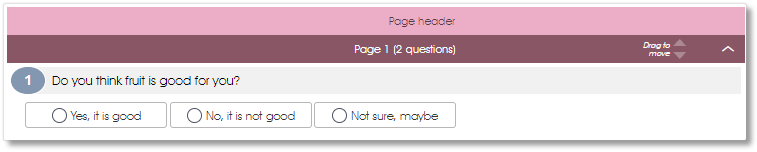
Clicking the Define manually button will generate an empty questionnaire with only the mandatory Page header and a question page:
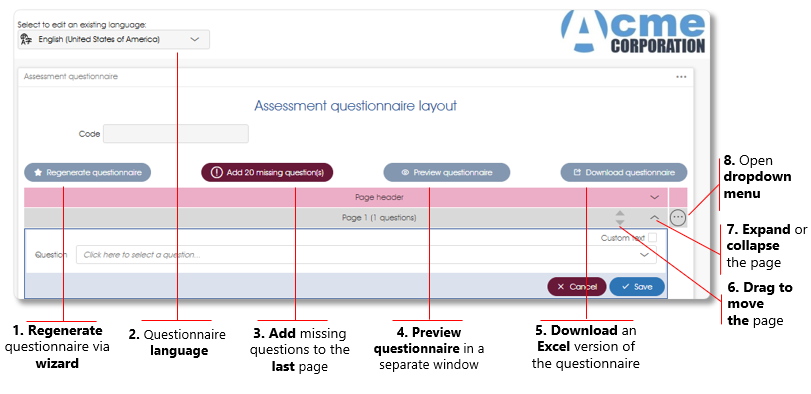
The descriptions of the work area components, provided for the wizard-generated report image above, also apply to the work area components available for the manually created questionnaire.
 |
Edit an existing questionnaire |
Select a questionnaire (it will be highlighted in burgundy), and then click on the Edit questionnaire toolbox function in the side panel or in the dropdown menu in the work area. Alternatively, just double-click on the questionnaire's name to edit it.
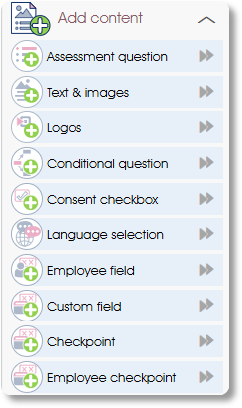
The Add pages and Add content toolbox groups in the left side panel contain the functions for manually inserting additional pages and page content.
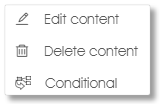
Edit content in the dropdown menu in the work area allows you to modify content attributes. Delete questionnaire pages and/or content via the Delete page and Delete content functions in the dropdown menus in the work area.
The Make conditional dropdown menu function is utilized when including conditional branching in a questionnaire.
Renaming a questionnaire
The questionnaire's name is displayed in the upper left corner of the work area. The questionnaire can be renamed by clicking the rename icon to the right of the questionnaire name, modifying the name as required, then clicking the blue-circled tick to save the modifications or the burgundy-circled cross to cancel them.
The names Questionnaire, Questionnaire #1, Questionnaire #2, etc, are automatically assigned to assessment and pulse questionnaires during creation. Renaming them to something meaningful is recommended.
Note that a diagnostic survey questionnaire's name is the model's name - it is inadvisable to rename a diagnostic questionnaire as doing so will also rename the model.
Defining the Header Content
The page header section will be repeated on all pages of the online questionnaire. A header section typically includes the assessment’s name, company logos or branding, and survey-specific themes. Hint: to ensure that logos and banner images are as crisp as possible, use logo images created at a resolution that does not exceed 220 pixels wide or 65 pixels high, and banner images at a maximum resolution of 940 pixels wide and 180 pixels high.
The header section will be displayed in full on the first page of the online questionnaire, but will automatically be scrolled off-screen on subsequent pages if the questions on the page and the header section combined exceed the screen size. The user can, however scroll up at any point to view the full header section.
The Text & Images and Logos functions in the Add content toolbox group can be used to construct a header section for a questionnaire that does not have one, most likely because it was manually generated.
Previewing the Online Questionnaire
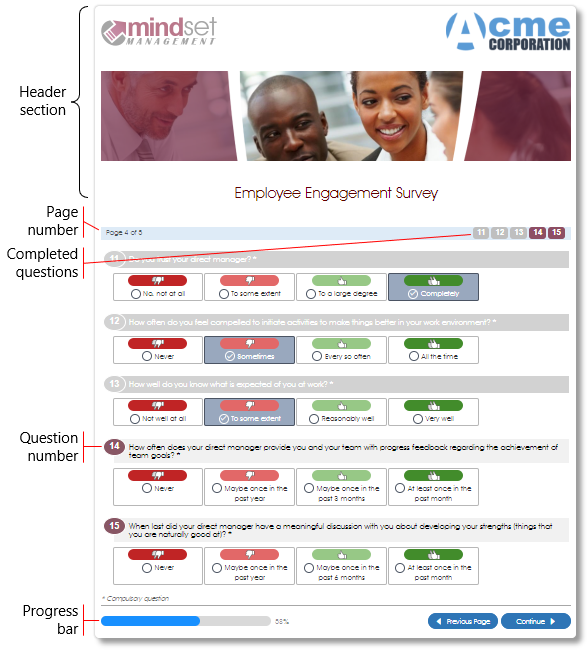
Click on the Preview questionnaire button to preview all the pages of the questionnaire. The Previous Page and Continue buttons at the bottom of the screens will allow you to page back and forth through the online questionnaire without having to complete any of the questions. You will however have to complete a few of the questions if you want to see the progress bar in action.
 |
Duplicate a questionnaire |
Select a questionnaire (it will be highlighted in burgundy), and then click on the Duplicate questionnaire toolbox function in the side panel or in the dropdown menu in the work area. A copy of the questionnaire will be saved with the literal (Copy) appended to the questionnaire's name. Edit and rename the questionnaire as required.
 |
Delete a questionnaire |
Select a questionnaire (it will be highlighted in burgundy), and then click on the Delete questionnaire toolbox function in the side panel or in the dropdown menu in the work area. A questionnaire that has been assigned to a survey or assessment project cannot be deleted and an error message will be displayed if an attempt is made to do so. A dialogue window requiring you to confirm the deletion of an unassigned questionnaire will open. Click on the OK button to delete it.
Adding or Editing Questionnaire Pages
 |
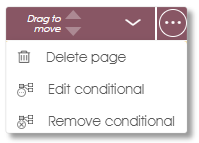 |
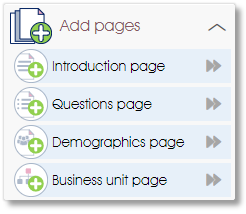
The Add pages toolbox group in the side panel allows you to insert additional pages into the questionnaire by dragging and dropping them into the desired positions in the work area. Deleting existing pages can be initiated via the dropdown menu on the right-hand end of the page entry in the work area. Including Conditional Branching in a Questionnaire describes the Edit conditional and Remove conditional functions.
Content can be added to a questionnaire page via the Add content toolbox group in the side panel.
 |
Add – or drag and drop – an introduction page to a questionnaire |
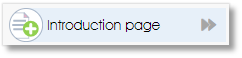
To add an Introduction page to the layout click and drag the associated toolbox function from the side panel and drop it in the desired position in the questionnaire. If necessary, the content can be edited by clicking on the toolbox dropdown menu in the work area and selecting the Edit content menu item. Translation is described in the Translating the Introduction page section.
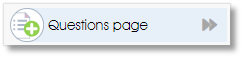 |
Add – or drag and drop – a question page to a questionnaire |
To add a Questions page to the layout click on the toolbox function in the side panel and drag and drop the page into the questionnaire work area. A dropdown field permitting the selection of the first question will be presented on the newly added page. Questions that have already been included in the questionnaire, if any, will be marked with a green tick mark and cannot be reselected.
Select the question to be added by clicking on the dropdown field and selecting the question from the list. Click on the Save button to save the selected question. (See the Add question section for a more detailed explanation of inserting and editing questions.)
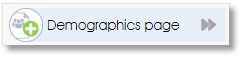 |
Add – or drag and drop – a demographics page to a questionnaire |
Demographic questions should only be included in a questionnaire if the participants' demographic data, stored in Manage PARTICIPANTS>Demographics is incomplete or if you want to use the participants' responses to update it. To include demographic questions in a questionnaire:
- Add a demographics page that contains a question concerning each demographic category defined in Manage PARTICIPANTS>Demographics to the questionnaire by dragging and dropping the Demographics page toolbox item onto the questionnaire work area.
- Select the demographic categories that should be included in the questionnaire by:
- clicking the dropdown menu icon to the right of the demographic questions and selecting the Edit content from the displayed dropdown menu,
- including demographic categories in the questionnaire by checking their Include* checkboxes,
- optionally making them editable by checking their Allow editing* checkboxes, and
- clicking on the Save button at the bottom of the panel.
Translation is described in the section covering Translating the Demographics page.
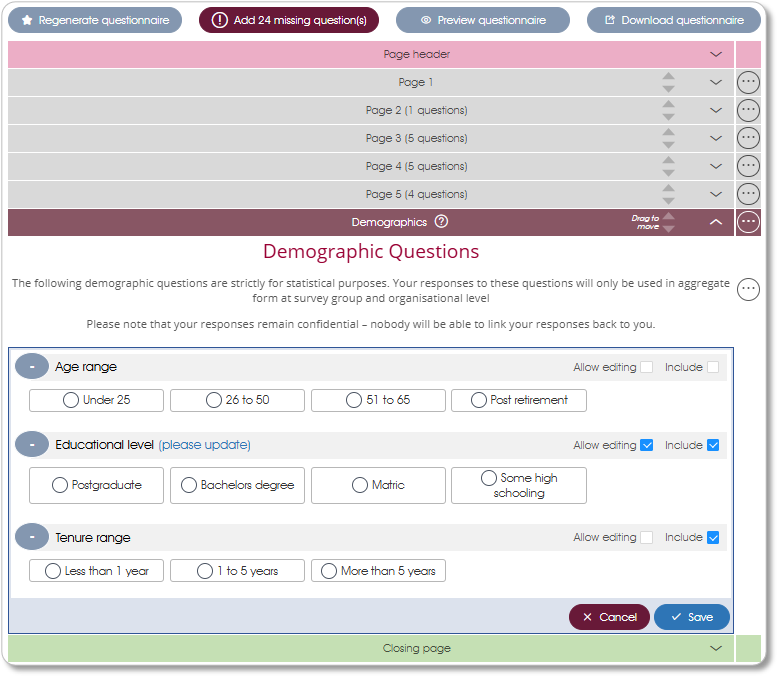
*Additional notes on Include and Allow editing checkboxes:
- If only Include has been selected for a demographic category participants will be able to see which attribute (if any) of the demographic category has been stored for them in Manage PARTICIPANTS.
- If the participant is permitted to specify an attribute (if none has been pre-populated) or replace the attribute (previously stored for them in Manage PARTICIPANTS) Allow editing must also be checked for the demographic category.
- If neither checkbox has been ticked for a demographic category the questionnaire presented to the participant will not contain that demographic category.
 |
Add – or drag and drop – a business unit page to a questionnaire |
To allow respondents to indicate the division, department, or business unit in which they work, include a dedicated Business unit page in the questionnaire. To insert the page, drag and drop the Business unit page toolbox item into the questionnaire work area.
Note: respondents should only be asked to indicate their business units if it is impossible to pre-populate their business unit affiliations in Manage PARTICIPANTS.
The business unit function provides a branching mechanism to mirror an organization with a hierarchy of business units. The first business unit selection field will ask the respondent to select the highest-level business unit, e.g. Regional Office. A second business unit selection field will then be displayed, asking the respondent to select the next level business unit, e.g. Division. This mechanism will ensure that respondents select only valid sub-units that fall under the selected higher-level unit.

Please note that only business units, defined in Manage PARTICIPANTS with inflated headcounts to accommodate off-system employees, will be available for selection by participant(s) in the Business unit page of their questionnaire(s). Also note that the Business unit page will not function correctly in the online questionnaire or in the questionnaire editor if no business unit has been in defined in Manage PARTICIPANTS with an inflated headcount.
To ensure that the correct terminology is used to describe a business unit at a particular level (division, department, team, etc), edit the descriptions for the different business unit levels. See Translating the Business Unit page if applicable.
Adding or Editing Page Content
 |
 |
The Add content toolbox group in the side panel allows you to add questions, descriptive text, images, logos and a range of other content to questionnaire pages. Content can be edited and/or deleted via the dropdown menu to the right of the content entry in the work area. Translation of questionnaire content is described in the Translating Other Questionnaire Content section. Including Conditional Branching in a Questionnaire describes the use of the Conditional function.
 |
Add – or drag and drop – a question to a questionnaire page |
To add a question to a page, drag the question toolbox function from the side panel and drop it onto a questionnaire page in the work area. Select the question to be added by clicking on the dropdown field and selecting one from the list. Questions already included in the questionnaire will be marked with a green tick mark and cannot be reselected. Click on the Save button to save the selected question.
To edit a question (i.e. to select a different question) or to delete a question, click on the question’s dropdown toolbox and select the Edit content or Delete content option. To reposition a question, simply click on the question and drag it to a new position.
If checked, the Custom text checkbox permits you to enter alternate wording for the question when presented to a respondent via the current questionnaire. The question text as defined in the model is unaltered, and the question will be presented with the model-defined wording in all other questionnaires associated with the model (unless it has been redefined via Custom text in one or more of those other questionnaires).

 |
Add – or drag and drop – text and images to a questionnaire page |
To add descriptions (text) and images to a page, drag the Text & images toolbox function from the side panel and drop it onto a questionnaire page in the work area. The text editor will automatically be opened and allow you to format the text as required. Clicking on the Save button will save the changes and close the text editor.
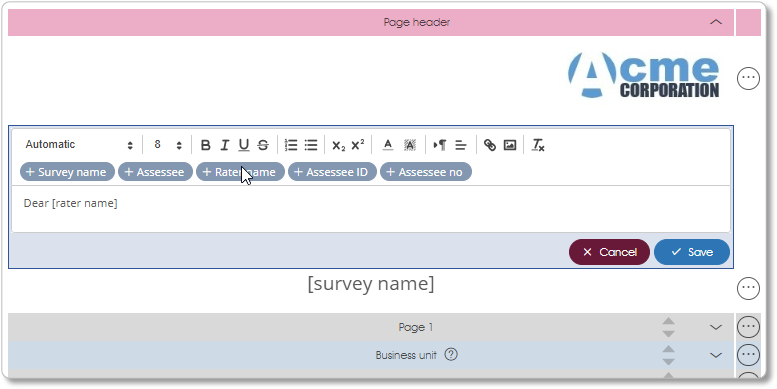
Auto-populated fields (e.g. +Rater name in the image above) can be inserted into the text by clicking on the auto-populated field while your cursor is positioned at the desired place in the text. These fields will be automatically populated with relevant information when the questionnaire is presented to the respondent (see Auto-populated fields for more).
The text editor provides full control over the layout and formatting of the text and images:
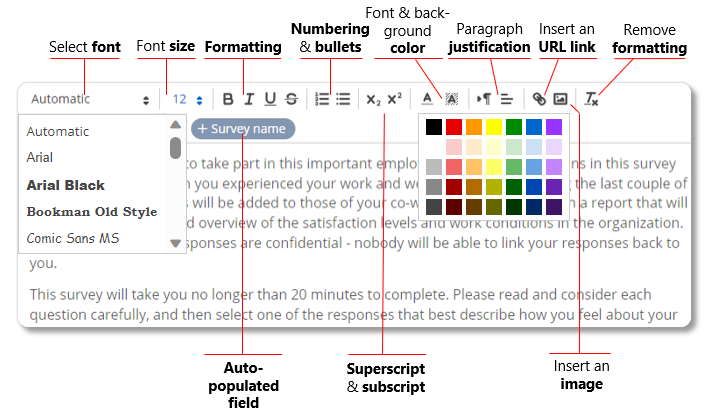
The Insert an image icon (see above) is used to insert images via the text editor. Images can be scaled and left or right justified as required. Hint: to ensure that images are as crisp as possible create them at a maximum resolution of 940 pixels wide and 180 pixels high.
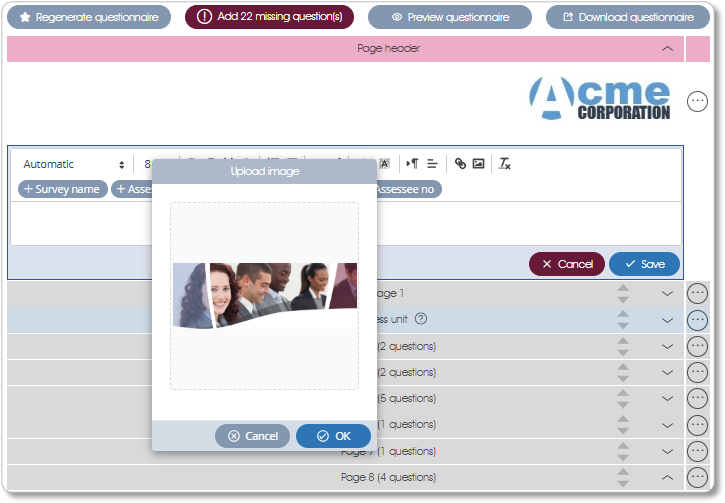
Clicking the Insert an image icon opens the Upload image window. Please note that images cannot be dragged and dropped into the Upload image window. Click anywhere in the rectangular box and a file explorer window will open allowing you to select the image file to be uploaded.
 |
Add – or drag and drop – logos to a questionnaire page |
Add the Partner and/or Client logos to the header page if you want them to be displayed at the top of each page. To add the logos to a page, drag the Logos toolbox function from the side panel and drop it onto a questionnaire page in the work area. Select the logos that should be displayed on the left or right side of the page and click on the Save button.
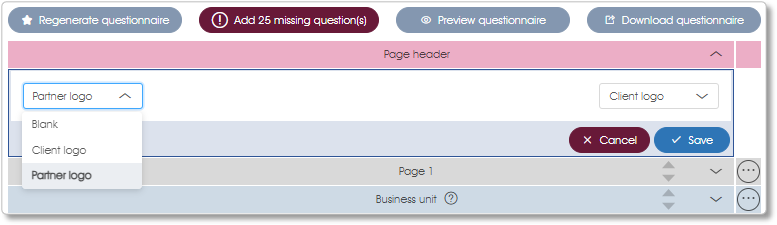
The Partner and/or Client logos are defined in their respective Engage EX profiles. Using logo images created at a resolution that does not exceed 220 pixels wide or 65 pixels high ensures that they are as crisp as possible.
 |
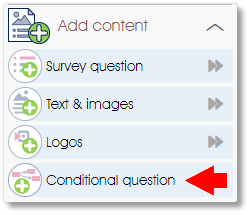
Add – or drag and drop – a conditional question to a questionnaire page |
Various methods exist for including conditional branching in a questionnaire. One possibility is to define a single-choice Likert question as a conditional question and then include it, via the Conditional question toolbox function, in the questionnaire (this is described below, and in much greater detail in conditional branching step 2). The conditional question must then be edited to include the branching mechanism (described below and in more detail in conditional branching step 4).
When adding a pre-prepared conditional question to a questionnaire:
- Ensure that your pre-defined conditional Likert question has not already been included in the questionnaire; delete it if necessary.
- Drag the Conditional question toolbox function from the side panel and drop it onto a page in the work area.
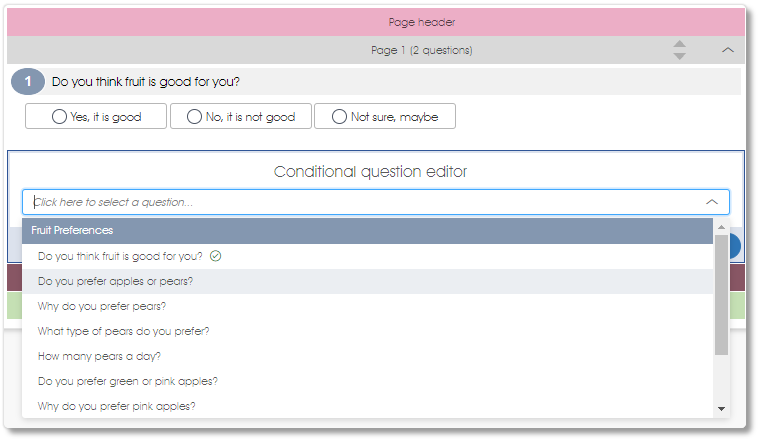
- Select your pre-defined conditional single-choice Likert question from the dropdown list in the Conditional question editor (see Add question for general information regarding inserting and editing questions).
- Configure the Conditional question to branch elsewhere in the questionnaire or to continue with the next question by selecting either Select page or Next question, respectively, for each choice. If Select page has been chosen you will be obliged to select a destination page from the dropdown next to it. See How to Include Conditional Branching for a more detailed explanation.
- Click the Save button.
 |
Add – or drag and drop – a consent checkbox to a questionnaire page |
A Consent checkbox is used to obtain the participant's explicit consent to a statement or condition. It is impossible to proceed to the next questionnaire page if the Consent checkbox has not been checked.

Drag the Consent checkbox toolbox function from the side panel and drop it onto a questionnaire page in the work area. Replace the default description in the Consent checkbox with the statement or condition to which the participant must consent and click the Save button.
 |
Add – or drag and drop – a language selector to a questionnaire page |
A Language selection dropdown allows participants to select the language in which the following online questionnaire pages are to be presented. Participants can click on the Language selection dropdown in the questionnaire to display the list of languages into which the current model and associated questionnaires have been translated.

The online questionnaire is presented to the participant in the language specified in the assessment or survey link, which is set to the language specified for the participant in Manage PARTICIPANTS. The Language selection dropdown permits the participant to select the questionnaire to be presented in any language for which a translation exists (see Associating languages with models for additional information).
 |
Add – or drag and drop – an employee field to a questionnaire page |
To gather employee identification information as part of a survey or an INDIVidual assessment add one or more Employee fields to the questionnaire. Please note that 360 multi-rater assessments and questionnaires being captured via Paper/Capture links cannot utilize Employee fields.
There are four Employee field types, corresponding with the four mandatory employee identification fields defined in Manage PARTICIPANTS i.e., Full name, Employee number, Email address, and National ID.
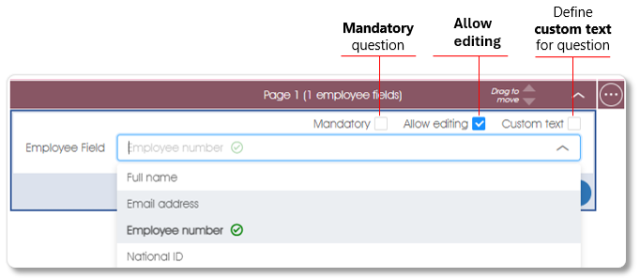
Select the type of Employee field from the dropdown list. Only one Employee field of each type may be included in a questionnaire. The Employee field types that have already been included in the questionnaire will be marked with a green tick mark and cannot be reselected. Click the Save button to add the selected Employee field to the questionnaire.
If the Mandatory checkbox on the Employee field has been checked the Employee field must contain a value; either the participant must enter a response into it or it must have been automatically populated from the organizational structure. If it does not contain a value the participant will not be able to continue to the next page of the online questionnaire. Be aware that some employee identification fields might not have valid values in certain circumstances. For example, an Email address Employee field may not have a valid value in an organization that does not issue email addresses to all employees. Making such a field mandatory could result in surveys and/or INDIVidual assessments which some respondents cannot complete.
Leaving the Allow editing checkbox unchecked creates a display-only Employee field, which implies that it must be pre-populated from the organizational structure if it is to have any content. Conversely, checking the Allow editing checkbox permits the respondent to either provide the required information or update it.
Adding Custom text (i.e. alternate wording) to a question permits you to customize the question to suit the participants who will be completing the online questionnaire.
Using Employee fields in a questionnaire describes their use in greater detail.
 |
Add – or drag and drop – a custom field to a questionnaire page |
Custom fields are additional employee information, though not employee identification, fields. They are configurable via the Manage PARTICIPANTS > Edit Employee Records function and may be updated by participants via Custom fields included in survey or INDIVidual assessment questionnaires. Please note that 360 multi-rater assessments and questionnaires being captured via Paper/Capture links cannot utilize Custom fields.
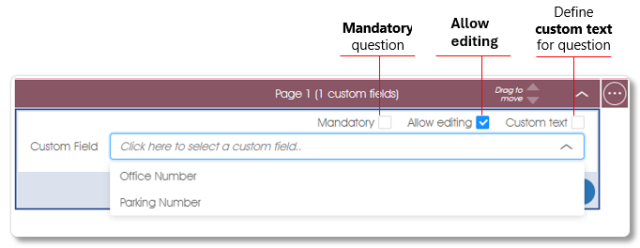
Bear in mind that Custom fields contain additional information concerning the employee/respondent so Custom field responses are stored in Manage PARTICIPANTS (not with the survey data) when the questionnaire is submitted.
Drag the Custom field toolbox function from the side panel and drop it onto a questionnaire page in the work area. Click the dropdown arrow and select an unmarked Custom field from the list. Only one Custom field of each type may be included in a questionnaire, custom fields that have already been included in the questionnaire will be marked with a green tick mark and cannot be reselected. Click the Save button to complete the addition.
A detailed description of the Mandatory, Allow Editing and Custom text checkboxes is available here.
 |
Add – or drag and drop – a checkpoint to a questionnaire page |
Checkpoint processing sends all the responses that have been received from the participant to the server where a decision is made regarding subsequent navigation within the questionnaire. The decision process is contingent upon the model definition. The possible results of a Checkpoint are:
- Done: Proceeding to next question:
Optionally show a message and proceed with the questionnaire as normal.
- Done: Skipping to end:
Optionally show a message, then bypass the rest of the questionnaire, allowing the user to Submit immediately.
- Error: Proceeding to next question:
Optionally show a message, and then proceed with the questionnaire as normal.
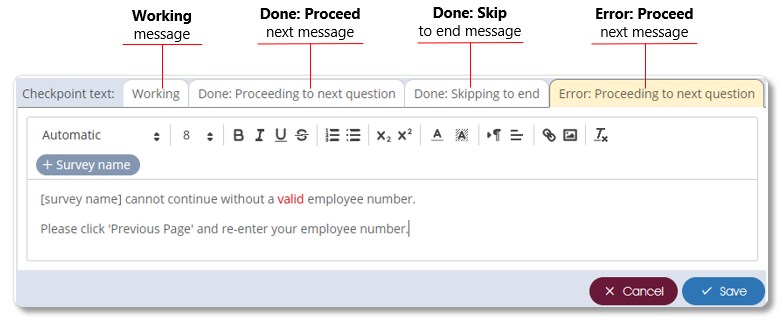
The messages displayed for each of these results, as well as the notification while contacting the server (Working), can be edited via the text editor in the Checkpoint. Omit the text to hide the checkpoint. Click the Save button to save the Checkpoint and its customized messages.
 |
Add – or drag and drop – an employee checkpoint to a questionnaire page |
An Employee checkpoint is a special case of a Checkpoint (see above). It is a checkpoint pre-programmed to validate Employee field information, provided by the participant via a survey or an INDIVidual assessment online questionnaire, against the organizational structure. Please note that 360 multi-rater assessments and questionnaires being captured via Paper/Capture links cannot utilize an Employee checkpoint.
The possible results of an Employee checkpoint are as follows:
- Done: Employee details found:
Optionally show a message and proceed with the questionnaire as normal.
- Error: Employee not found:
Optionally show a message, then return to the questionnaire page containing the Employee field(s) when the Previous Page button is clicked.
The messages displayed for each of these results and the notification while contacting the server (Working) can be edited via the text editor in the Employee checkpoint. Click the Save button to save the Employee checkpoint and its customized messages.
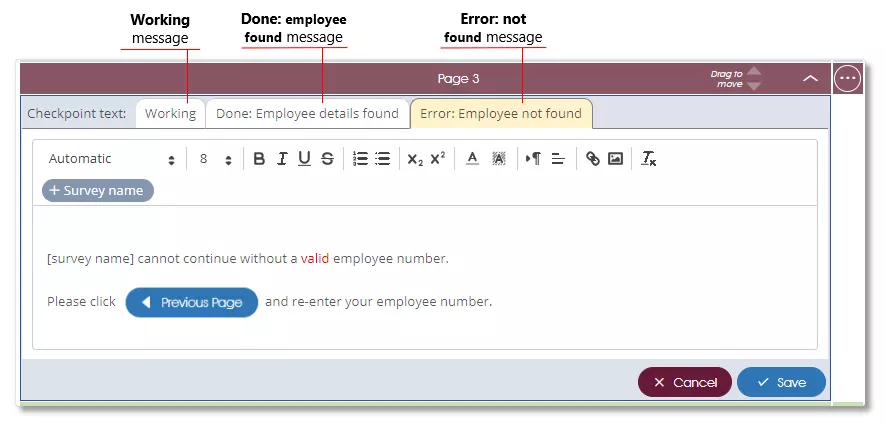
Using Employee checkpoints describes their use in questionnaires.
How to Include Conditional Branching in a Questionnaire
The conditional branching feature allows you to add branching logic to your questionnaires, guiding respondents to questions that are relevant to them and/or their circumstances. Using conditional branching offers respondents a more personalized survey experience, which improves participation and completion rates, and yields more reliable and accurate survey response data, leading to better decision-making.
The default navigation path through a questionnaire is straight down: from top to bottom, from the first question to the last, followed by submission. Conditional branching permits either simple (for example, skipping one or more irrelevant question(s)) and/or complex navigation paths through the questionnaire. To activate it, it is necessary to define:
- Conditional branching decisions - which alter the navigation path through the questionnaire;
- Conditional branching destinations - points within the questionnaire at which alternate navigation paths can begin.
Conditional Branching Decisions
Conditional branching decisions are adaptations of single-choice Likert questions.
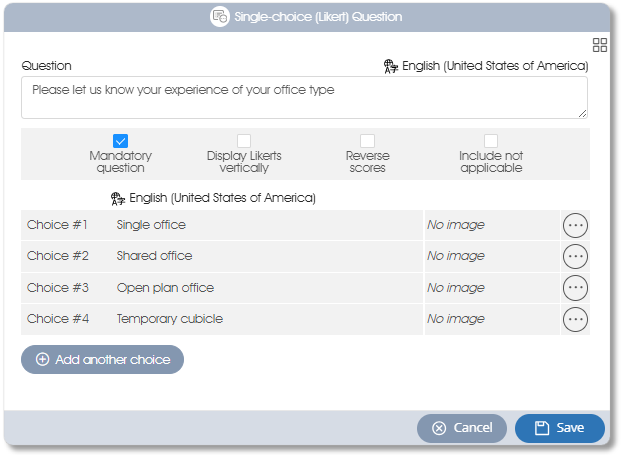
The conditional branching Likert question(s) differ from standard Likert questions only after their inclusion in the questionnaire. In the questionnaire they must have conditional status to be capable of performing their branching-decision functions.
Their conditional status can be conferred by adding them to the questionnaire specifically as conditional questions via the Conditional question toolbox function.
Alternatively, if your conditional branching Likert question(s) have already been included in the questionnaire, (by, for example, the Questionnaire Wizard or Add missing questions; or via the Add Question or add Question page toolbox functions), your conditional branching Likert question(s) must, explicitly, be made Conditional via the dropdown menu in the work area, to the right of the question.
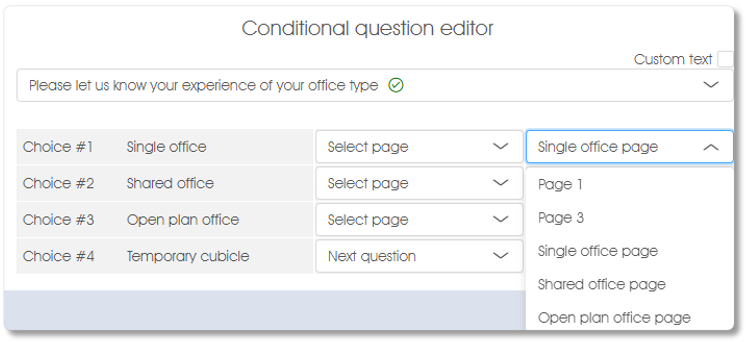
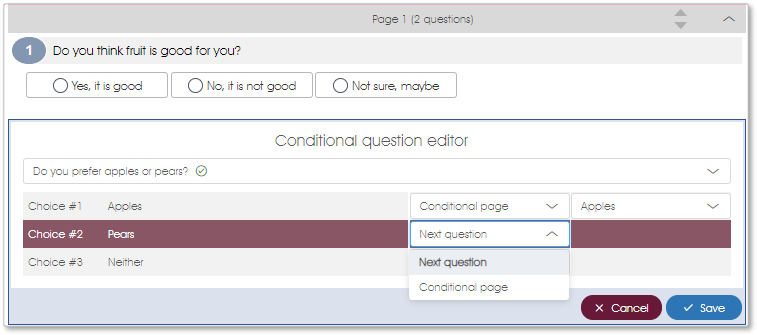
Once the Likert question has Conditional status, clicking Edit content in the dropdown menu item will open it in the Conditional question editor via which the branching process can be defined.
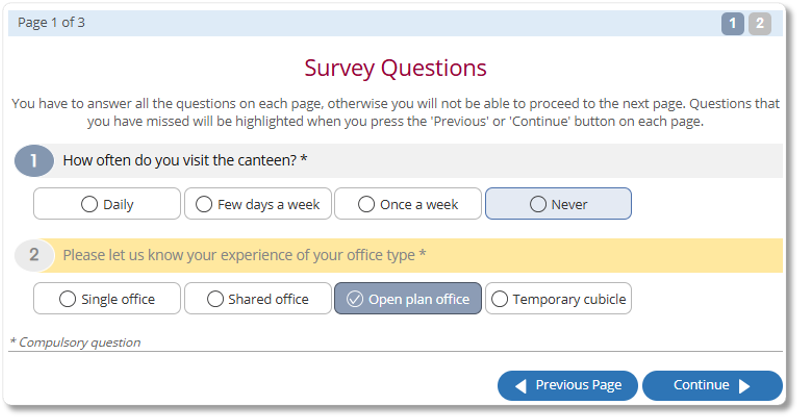
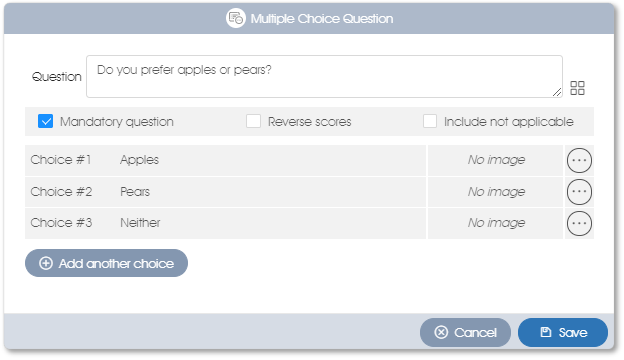
The default action for every Likert choice is to proceed to the Next question. Should the participant select an option defined as Select page (see choices #2, #3 or #4 in the above example), navigation through the questionnaire will be redirected to the top of the page selected in the rightmost dropdown.
Be aware that:
- Likert question(s) used for conditional branching decisions must be checked as Mandatory questions to ensure that participants activate their decision-making properties.
- Navigational modifications will only be effected when Continue is clicked.
- A maximum of one conditional branching Likert is permitted per questionnaire page.
- All mandatory questions on the page, including any below the conditional question, will have to be answered.
- It is recommended that all conditional questions be positioned at the bottom of their pages.
Conditional Branching Destinations
Conditional branching always redirects to the top of a Conditional page.
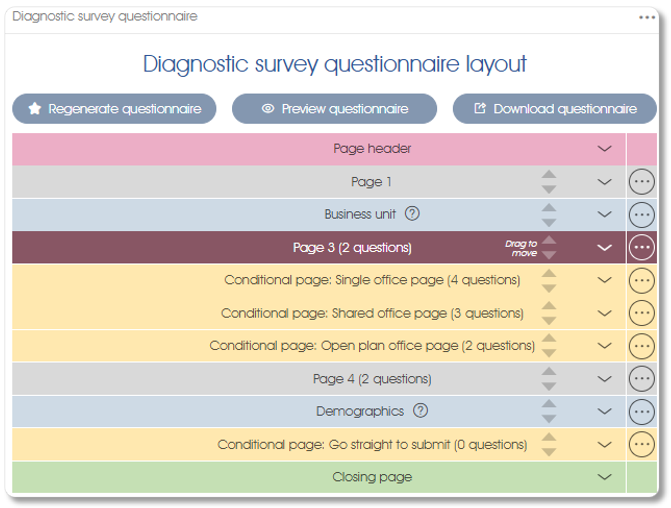
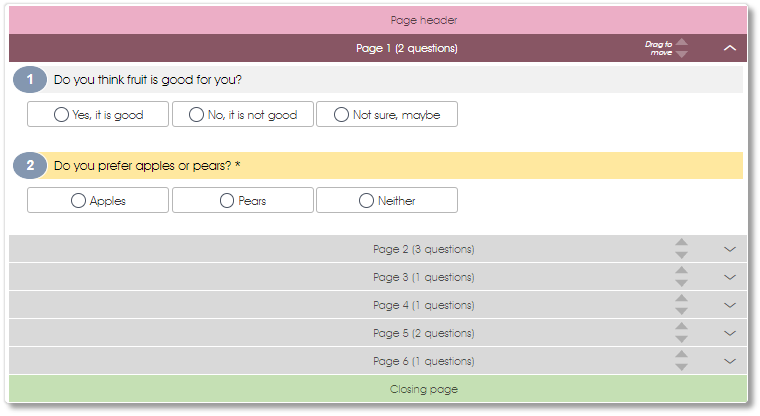
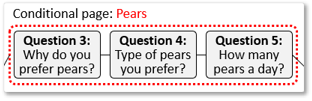
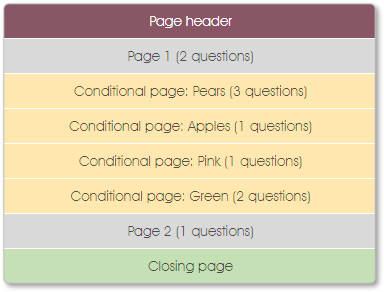
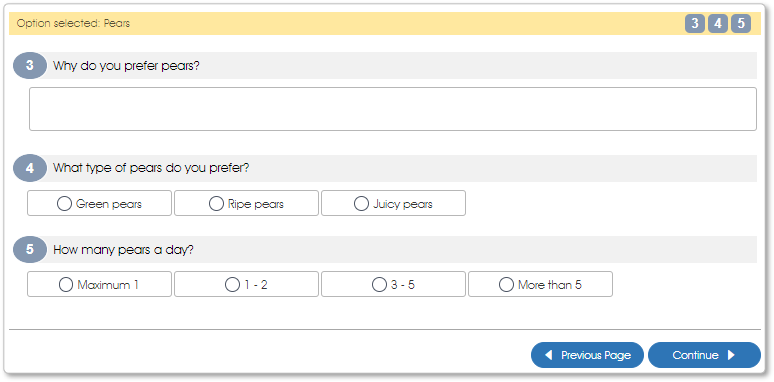
The questionnaire depicted above contains conditional pages (coloured yellow) and non-conditional pages (grey). A participant will be redirected to the top of the conditional page named as the Select page destination in the conditional branching Likert option selected.
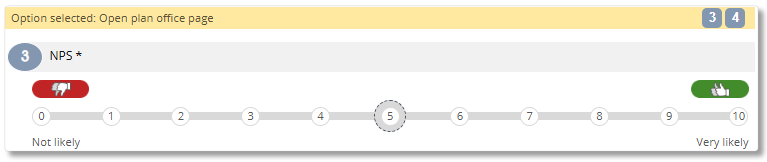
Using the example presented in the Conditional question editor image above - if a participant selected the Shared office option and clicked Continue
the page designated Conditional page: Shared office (3 questions) in the questionnaire above would be presented:
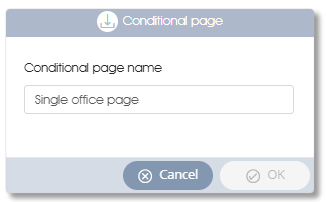
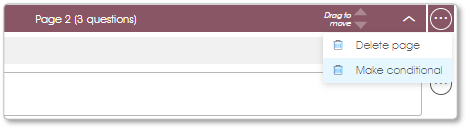
Non-conditional pages can be converted via the Make conditional option in the page's drop-down menu (see questionnaire image above). Conditional pages' drop-down menus contain Edit conditional and Remove conditional options. The former will open the Conditional page function which renames conditional pages. Using it to ensure that their names reflect their purpose is highly recommended.
Referring again to the Conditional question editor image above, note that the drop-down containing choices for the Select page option lists both conditional and non-conditional pages. Should a non-conditional page be designated as a Select page destination in the Conditional question editor, the non-conditional page will be automatically converted to a conditional page. Renaming the newly converted conditional page, via its Edit conditional option, is highly recommended.
Please note that:
- No Conditional page is ever presented to any participant unless it is the explicit redirection destination of a selected option, and it will be shown only to respondent(s) who select that specific option.
- A conditional page, which contains only text, added just before the Closing page (see the questionnaire image above) can provide a destination for skip-to-end/submit questionnaire navigation logic.
Conditional Branching Example
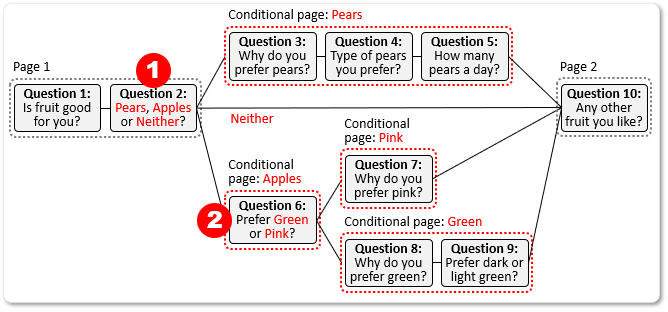
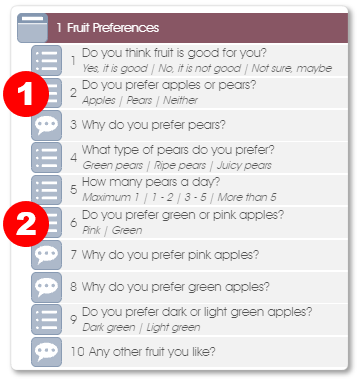
The process that you can follow to configure a questionnaire with conditional branching logic is outlined in this section. A short survey with 10 questions (see diagram below), of which Question 2 and Question 6 will be conditional questions, will be used in this example:
- Question 2: Conditional Branch #1: asks the respondents to choose between Pears, Apples, or Neither. Choosing Pears or Apples will take them to different conditional pages in the questionnaire while the Neither option will take them to the next available question, which, in the example below, will be on Page 2 (the last page of the questionnaire).
- Question 6: Conditional Branch #2: asks the respondents who chose Apples another conditional question – this time to choose between Green or Pink apples, with each choice taking them to a different conditional page.
|
1. |
Define the model – create a new model by clicking on the side-panel toolbox function.
|
|
2. |
Define the questionnaire – the next step will be to generate or create a questionnaire where you can then change the required questions to make them conditional. You can either use the Questionnaire layout wizard to generate the questionnaire, or you can create it manually. Follow the steps outlined below to create a conditional questionnaire manually:
|
|
3. |
Create conditional (restricted) pages – the next step will be to convert the questionnaire pages which will be the landing pages for conditional questions, to Conditional pages.
|
|
4. |
Configure the conditional questions – the next step will be to link the Likert options of the conditional questions to the related conditional pages:
|
|
5. |
Preview the questionnaire – preview and test the questionnaire’s logic by clicking on the Preview questionnaire button at the top of the questionnaire. Select each of the conditional questions’ different options and check that the correct conditional pages are loaded. Click on the Previous Page buttons to navigate back to a conditional question and select and check all the other conditional options and their related pages. |
Using Employee Fields/Checkpoints in Questionnaires
Please note: the information in this section does not apply to:
- 360 multi-rater assessments,
- questionnaires being accessed via Paper/Capture links.
Employee fields are used to gather and/or display the personal identification information (Full name, Employee number, National ID, Email address) of survey or INDIVidual assessment participants. The employee information can be added to the organizational structure from questionnaire responses and subsequently processed via Manage PARTICIPANTS.
Employee fields enable participants to add themselves to the organizational structure or update their personal identification information stored in Manage PARTICIPANTS.
An Employee checkpoint is added to a questionnaire to ensure that only authorized respondents participate in the survey or INDIVidual assessment. It must be preceded by Employee field(s) to gather personal identification information from the participant. The Employee checkpoint verifies the garnered personal identification information against the organizational structure.
Designing a Questionnaire to Verify Participants
Some surveys are restricted, and only authorized respondents may participate. The following steps are required to create a questionnaire through which participants can be verified:
- The Questionnaire settings:
Populate employee details must be set to Yes,
Save progress to server must be set to Yes.
-
The Employee field(s) necessary to capture the respondent's personal identification information must be included at the start of the questionnaire with Allow editing checked. Please note that:
- the Full name Employee field cannot be used on its own for verification and
- the page’s other contents (if any) are limited to Text, Images or Logos.
-
The Employee checkpoint must be at the top of the next questionnaire page.
-
The Employee checkpoint may be followed on the same page by any Employee field(s) that were not presented on the previous page. (There can only be one Employee field of any given type in a questionnaire). The Employee fields on the same page as the Employee checkpoint will not be editable, regardless of the checkbox settings on the Employee fields.
-
The assessment or survey questions start on a new page immediately following the two pages dedicated to the Employee field(s) and the Employee checkpoint (described in the points above). Add questionnaire pages and content as usual to create the remainder of the questionnaire.
-
If a Demographics page is present in the questionnaire, demographic information will be updated if modified by the participant.
-
Please note: Employee fields and/or checkpoints deal with personal identification information - see the section describing Precautions to be taken when using Employee field(s) and/or Employee checkpoint(s) in a questionnaire.
Designing a Questionnaire to Add Participants
A customized questionnaire will be needed if some or all participants have not been pre-populated in Manage PARTICIPANTS and respondents are permitted to add themselves via the survey. Create a questionnaire which permits participants to add themselves as follows:
- The Questionnaire settings:
Add new employees must be set to Yes,
Save progress to server must be set to Yes.
- To add participants to the organizational structure Full name and at least one of the other personal unique identifiers must be obtained via Employee fields for each employee to be added. It is recommended that Full name and at least one of the other personal unique identifiers be made mandatory as no notification of employee addition, successful or otherwise, is provided. The employee will not be added unless sufficient personal identification information is available. The Employee fields must have Allow editing checked. Other contents (if any) on page(s) containing Employee fields are limited to Text, Images or Logos.
-
The participant will be added to the organizational structure as soon as the respondent has provided Full name and at least one of the other personal unique identifiers. Note that even if the questionnaire is never submitted the entry will have been added to Manage PARTICIPANTS if the requisite personal information has been entered.
-
Participants can only be added to the organizational structure via non-targeted (i.e. Public or Kiosk survey or INDIVidual assessment) links. 360 multi-rater assessment questionnaires cannot be used to add participants to the organizational structure as they utilize only targeted links. (The online survey modes section includes a more detailed explanation of Public and Targeted links.)
-
Questionnaires used via non-targeted links should include a Business unit page. The business unit within the organizational structure to which the new employee will be added is determined by the participant’s responses on the Business unit page. Should the questionnaire not contain a Business unit page the newly added employee will be stored in the business unit named in the survey or INDIVidual assessment setting, Destination for new employees. If there is no Business unit page in the questionnaire and the Destination for new employees has not been set, the newly added employee will be stored in the root of the organizational structure and will have to be manually moved in Manage PARTICIPANTS to the appropriate business unit.
-
Demographic information will be saved if the questionnaire contains a Demographics page and the participant provides new and/or modified information.
Designing a Questionnaire to Update Participants
Participants may be permitted to update their personal information stored in Manage PARTICIPANTS via a survey or INDIVidual assessment. Although not a system necessity and accordingly not listed below, verification of the participant (via an Employee checkpoint) might be advisable before permitting updates to the organizational structure.
-
The Questionnaire settings:
Populate employee details must be set to Yes,
Save progress to server must be set to Yes. -
The components of the participant’s personal identifying information to be updated must be obtained via Employee fields.
-
The Employee field(s) included in the questionnaire will be populated with the participant’s personal information as it is currently stored in Manage PARTICIPANTS. The participant may modify the contents of any editable Employee field.
-
The participant’s modified personal information will be updated in Manage PARTICIPANTS on questionnaire submission.
- Demographic information will be updated if it is modified.
-
Please note: Employee fields and/or checkpoints deal with personal identification information - see the section below which lists precautions to be taken when using Employee field(s) and/or Employee checkpoint(s) in a questionnaire (below).
Precautions to be taken with Employee checkpoints and fields
Whenever employee personal identification or demographic information is obtained from Manage PARTICIPANTS and displayed on a questionnaire and/or updated by a participant there is always a risk of unauthorized access to personal information. The questionnaire designer must recognize and mitigate the risk of unauthorized viewing of other participants’ personal information.
Engage EX system dependencies that affect the usage of Employee checkpoints and/or Employee fields:
-
When the questionnaire contains an Employee checkpoint the Tester(s) must be employee(s) with personal information stored in Manage PARTICIPANTS. Testers who have not been pre-populated cannot be verified by the Employee checkpoint.
-
Questionnaires containing Employee checkpoints and/or Employee fields cannot be used in 360 multi-rater assessments or Paper/Capture links (a Kiosk link should be used if a multi-response mechanism is needed).
-
Do not make Employee fields mandatory when they follow an Employee checkpoint on the same page. Regardless of the checkbox settings on the Employee fields they are always non-editable when they are on the same page after the Employee checkpoint and no participant, whose Manage PARTICIPANTS data lacks the mandatory Employee field information will be able to update it or continue past that point in the questionnaire.
| For more information, click on a sub-menu item at the top of the page⇑ or in the right margin⇒ |